


Photoshop is one of the most popular and efficient tools when it comes to editing and manipulating images. This famous software developed by Adobe is used by both amateurs and professionals all over the world. One of the most important things to know is how to edit text in Photoshop. Learning the steps to do so will help you in making your images more attractive and effective. Plus, it will give you the skills you need to help you advance in your career. Or, just to have fun with editing images in a casual setting.
This guide will teach you how to add and edit text in Photoshop. Thus, it will allow you to learn how to manipulate your images better. This will enable you to make more stunning images that will wow your target market or social media audience.
Contents: Part 1. Is It Simple to Know How to Edit Text in Photoshop?Part 2. How to Add Text in Photoshop?Part 3. How Do I Edit Text in Photoshop?Part 4. Find Similar Images on Mac to RemovePart 5. Frequently-Asked QuestionsPart 6. Conclusion
Part 1. Is It Simple to Know How to Edit Text in Photoshop?
Fortunately, it’s easy to know how to edit text in Photoshop these days. This is because the Photoshop application has been developed to its fullest allowing you to manipulate the entire image (including text) with ease.
It’s simply typing out the text you want to place inside the image. But what if you have already saved the image, how do you edit text? Well, this is still possible if the text has its own layer. If it has been rasterized already, you won’t be able to edit it.
Part 2. How to Add Text in Photoshop?
Adding text in Photoshop is as easy as saying one to ten. You can find the toolbar usually on the left side of the software’s interface. It has a list of a lot of features you can use to manipulate the image you’re working on.
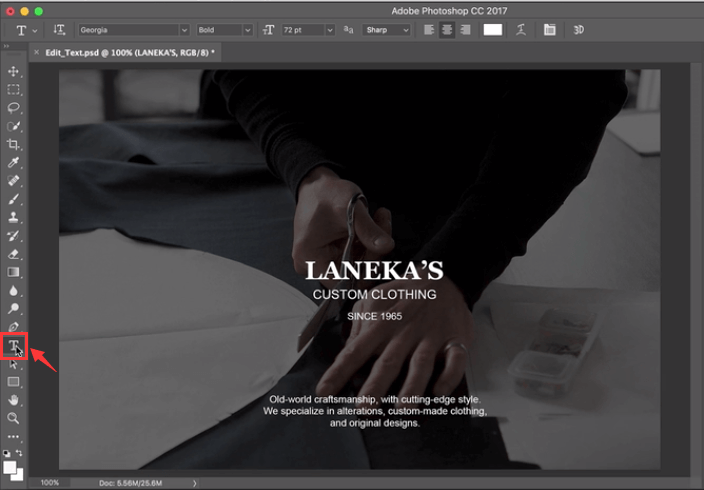
In order to add text to your image in Photoshop, simply click the T icon located in the toolbar. You can also press the T key on your keyboard. By default, the horizontal type tool for text (standard) will be selected.
You can also press the arrow located in the lower right corner of the said icon to change the options of the text editing feature. This will pop up a side menu with a lot of options in it including text masks and vertical text.
Once you have selected the appropriate tool you want, simply click the image on the area where you want to input your text. The text box will be placed in the position where you clicked it. Then, simply type the text you want to input.
Part 3. How Do I Edit Text in Photoshop?
How do you freely edit the text in Photoshop? There are many methods you can implement on how to edit the text in Photoshop. Below are some that may be relevant to this discussion:
How To Select Your Text
- Launch Photoshop – Open the Photoshop file you wish to edit the text of.
- Use Move Tool - Select the Move tool that looks like a cross. This is located on the toolbar. After that, double click towards the text you wish to select.
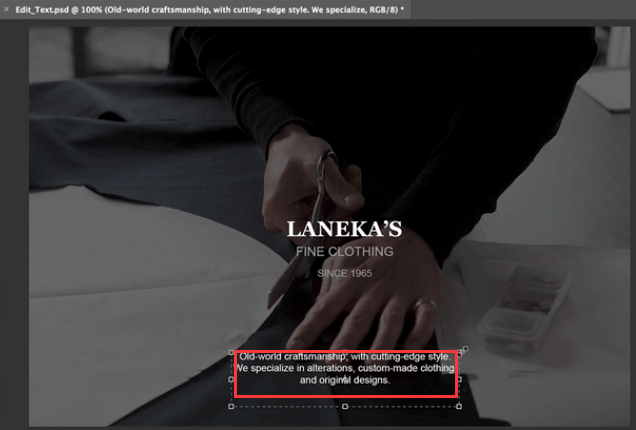
How do I edit text in a layer? Once you are finished selecting a particular text, you can edit it, change its color, resize it, and use copy and paste. If you wish to select characters within a type layer, choose the Type tool within Photoshop’s toolbar. After that, click and then drag your cursor over the specific characters you wish to select.
How To Edit Your Text In Photoshop
- Launch Photoshop – Open the Photoshop file you wish to edit the text of.
- Choose Type Tool – Click the Type tool within the toolbar and then select the specific text you wish to edit.
- Edit Through Options Bar – The options bar will be located at the top. You can use it to edit font type, size, color, alignment of text, and even text style.
- Implement Your Edits – Implement the edits you want to do by changing your font style, alignment, etc.
- Save Changes – Save the changes by clicking the checkmark at the end of the Options toolbar.
How To Copy And Then Paste Your Text
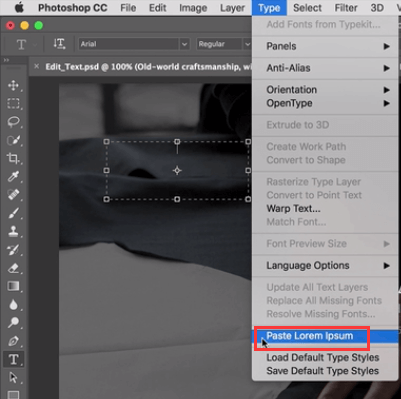
It is possible to copy and then paste text from another document to your Photoshop document (PSD) file. These text elements can be grabbed from a web page, from another PSD, from a Word file, and even from a PDF file, among others.
Here’s how to edit text in Photoshop by copying and pasting this element from a file that’s not made in Photoshop:
- Go To Your Non-Photoshop File – Click the cursor over the text to select it. Then press
Command + Con your macOS keyboard to copy it. - Launch PSD – Launch the PSD where you wish to paste your copied text. Choose the Type tool found within the toolbar at the left.
- Choose Type Layer – In the Layers panel, choose the type layer wherein you will place the pasted text.
- Edit And Paste – You can actually select Edit and then Paste. Or, you can press
Command + Von your Mac keyboard. This will paste the text to your PSD file. If you wish to undo the process, you can select Edit and then click Undo Paste Text.
Here’s how to edit text in Photoshop by copying and pasting this element from a PSD file:
- Launch PSD – Launch the PSD where you wish to paste your copied text. Select the specific text you wish to copy.
- Copy – Choose the option to Edit and then Copy. Or, you can press
Command + Con your macOS computer. - Launch The Second PSD – Now, launch the second PSD where you wish to paste the text. Choose a type layer afterward.
- Paste – Select the option to Edit > Paste. This will position the text at the center of the canvas you have in PSD. Or, you can also choose Edit and then Paste Special. After that, select Paste In Place. This other option will enable you to paste the text in a position identical to where it was on the copied file.
Resizing Text
If you wish to resize the whole text within a type layer, you can follow the steps below:
- Launch PSD – Launch the PSD you wish to edit. Choose the Move tool located within the toolbar at the left.
- Choose The Right Settings On The Options Bar – Make sure “Auto-Select: Layer” is ticked within the options bar. Click the text you wish to resize.
- Drag Transform Box Anchor Points – A transform box will be displayed. You can either drag the anchor points to resize selected text proportionally, you can hold your
Shiftkey down to resize your text in a non-proportional manner, you can hold yourAltkey down to ensure that the center of the selected text will be in the same place during resizing, and you can hold yourCommandkey to discovering skewed angles while resizing the text. - Save Options – Click the checkmark to save the edits you have made.
Moving Text In Photoshop
Moving your elements is one way on how to edit text in Photoshop. Here are the steps you should follow in order to do it:
- Launch PSD – Launch the PSD you wish to edit. Choose the type layer containing the text you wish to move.
- Choose Move Tool – Go to the toolbar and choose the Move tool. Check out the options bar. Ensure that Auto-Select Layer is ticked.
- Select Text – Click your text and check out the transform box containing a dark arrow.
- Modify Transform Box – Click and then move your transform box. Release your click in order to move the text to the new position.
Change Text Color
Knowing how to edit text in Photoshop involves learning how to change the color of the text element. Here are the steps to do it:
- Launch PSD – Launch the PSD you wish to edit. Choose the Type tool located within the toolbar at the left. Then, click the text you wish to modify the color of.
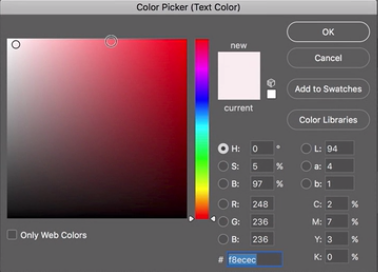
- Use The Color Picker – On Photoshop’s options bar, click the Color Picker.
- Select Color – You can move the slider and then choose the color that you want.
- Save Changes – Save your edits by clicking OK.
Aligning Your Text
This is another way on how to edit text in Photoshop. Here are the steps you should follow in order to modify the alignment of your text:
- Launch PSD – Launch the PSD you wish to edit.
- Choose The Type Layer – Select the specific type layer that has the text you want to modify the alignment of.
- Select Window – Choose the option Window and then select Paragraph. The Paragraph panel of Photoshop will be displayed.
- View Various Justify Options – Select the alignment option that you want.
- Save Changes – Save your changes by clicking the check button.
Rotating Your Text In Photoshop
Rotating is another way on how to edit text in Photoshop. Here are the steps you should follow to rotate your text in the manner that you like:
- Launch PSD – Launch the PSD you wish to edit. Choose the Move tool located within the toolbar.
- Change Options Bar Settings - Check out the options bar. Ensure that Auto-Select Layer is ticked.
- Select Text – Click the specific text you wish to rotate and check out the transform box that will appear and is located around your text element.
- Hover Towards Transform Box Corners – This will change the actual cursor to a curved arrow with two pointers in it.
- Click And Drag Curved Arrow – You can click and then actually drag the curved arrow with two pointers in a position that you want.
- Save Changes – Click the check to save changes.
Part 4. Find Similar Images on Mac to Remove
We recommend that you use iMyMac PowerMyMac and its Similar Image Finder tool in order to avoid having too many photos that are similar to each other.
This will help you save up more space on your Mac computer cause you will have the ability to find and delete unnecessary similar copies of your favorite photos.
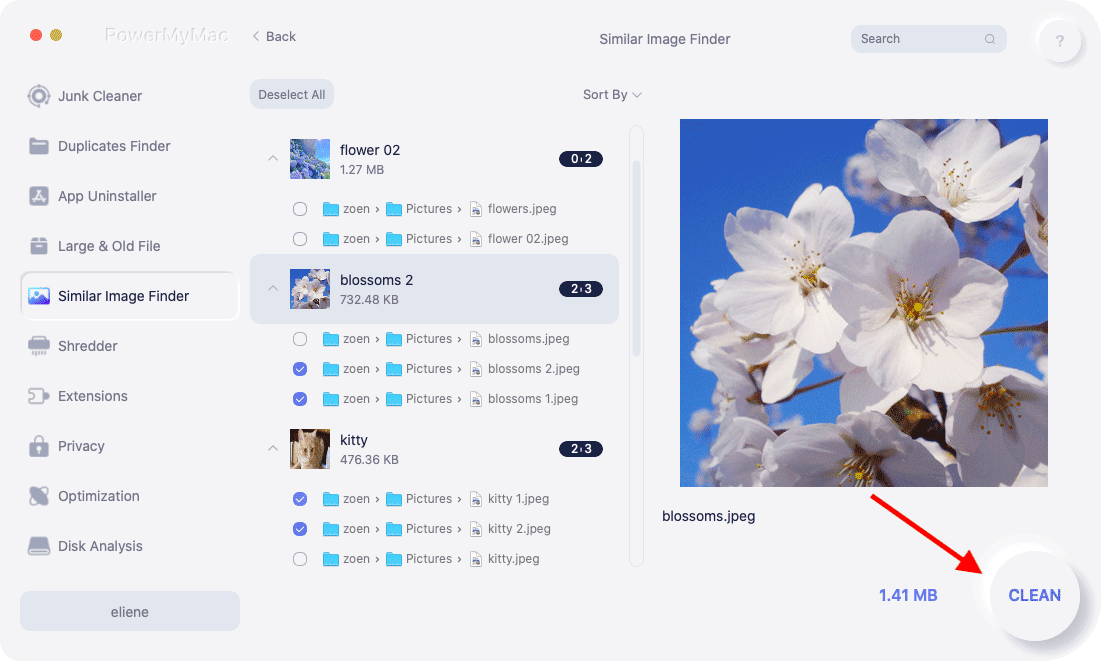
iMyMac also has other tools to help you clean up your system. It can detect slash delete your junk files, remove duplicate data, make sure your browser is secure, and uninstall apps without leaving leftovers.
The Similar Image Finder has a powerful scanning feature enabling you to find similar images in a few simple clicks. Deleting is possible as well. Plus, you can choose which photos to delete and which ones to keep.
Part 5. Frequently-Asked Questions
Below are the frequently-asked questions (FAQs) regarding how to edit text in Photoshop. Check out the answers we have:
Why Can’t I Edit Text In Photoshop?
This is probably because the text has already been rasterized. Therefore, it’s part of the entire image and doesn’t have its own layer. In this case, you won’t be able to edit your text in Photoshop easily. Make sure your text has its own layer before trying to edit it.
How Do I Edit Text After Rasterizing?
Unfortunately, you won’t be able to edit text after rasterizing. The way around here is to delete that text portion and repair the background around it. This can be very cumbersome and tedious. That’s why you have to be careful about rasterizing your image before you do it.
Part 6. Conclusion
Learning how to edit text in Photoshop is actually easy. A lot of people find Photoshop a difficult tool to learn. That’s somewhat true. But, if you actually begin to know what to do, you’ll be able to manipulate your images easily. If you want to know how to edit text in Photoshop, you must learn the steps we have given above. These include moving text, rotating text, changing color, and more. You’ll notice that editing text elements are fairly easy.
We also recommend that you use iMyMac PowerMyMac and its Similar Image Finder Module in order to delete similar photos on your Mac. This will make your computer perform faster due to increased storage space. Grab iMyMac PowerMyMac today!

