


 I use a Mac computer and I love it very much. I use it for watching videos, surfing the net, and editing photos. I also use it to save my work documents since it is very handy when it comes to my job. However, I have mistakenly deleted some of my files and I want to recover these files. How to recover deleted files on Mac?
Contents: Part 1. Is It Possible to Recover Deleted Files on Mac?Part 2. How Can I Recover Deleted Files from Mac without SoftwarePart 3. Restoring Previous Versions Of A Specific DocumentPart 4. How to Recover Deleted Files on Mac without Using Time MachinePart 5. Safely Deleting Files with iMyMac PowerMyMacPart 6. Conclusion
Part 1. Is It Possible to Recover Deleted Files on Mac?
Did you mistakenly delete a file that you needed so much? That must be super frustrating. Probably you deleted it just now or you deleted it last week and now you need it for a very important meeting tomorrow.
There’s bad news though. There’s no such thing as undeleting a file in Mac. However, there’s a good news. Depending on what you have done before, you can easily get to recover the files you have deleted on your Mac device.
So how to recover deleted files on Mac? The first thing you have to do is to check out if the file you have mistakenly deleted is really gone. You might have dragged it towards the Trash but you might not have emptied the Trash.
In this case, it’s still there. Now, just go to the Trash icon located inside the Dock. Check out the Finder window that is immediately opened. If you actually see the file you’ve been looking for, then drag it towards the desktop.
But what if the file still isn’t there? Well, that’s more complicated but there are ways on how to recover deleted files on Mac below.

Part 2. How Can I Recover Deleted Files from Mac without Software
How to recover deleted files on Mac without software? Here you can make use of the Time Machine.
This is where you should have a backup plan always in place for your Mac device. There must be two separate backups located in two destinations that are different from each other. Plus, these two must also be in two different physical locations.
If you use tools that create bootable clones (e.g. SuperDuper or Carbon Copy) and if you update them regularly, then you can recover your files. What you have to do is to mount the said clones and then copy the file from the clone towards your Mac device.
By now you might realize that backing up your files is very important to recover them in case something bad happens. One of the easiest methods in order to back up your data is to use the Time Machine of Apple. This is included in your macOS.
How to Recover Deleted Files on Mac with Time Machine
You just have to set it up one time and then you don’t have to worry about it. Let’s assume you use a Time Machine then. It will be very easy for you to recover files you have mistakenly deleted.
Here’s a step-by-step guide on how to do it:
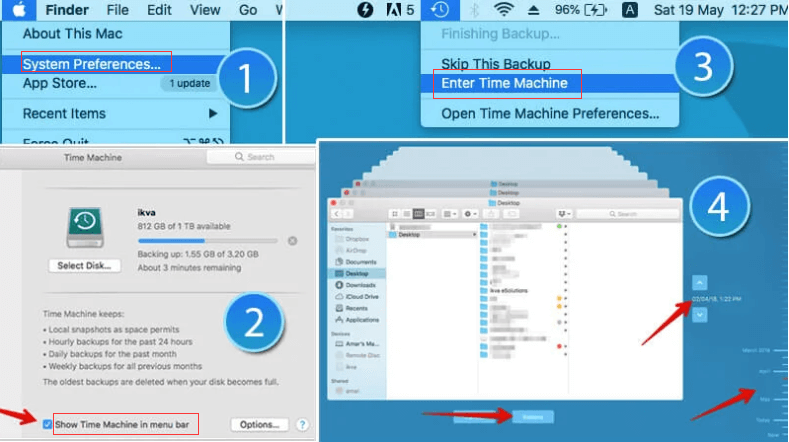
- Go to Mac’s menu bar.
- Visit the Time Machine.
- Select Enter Time Machine.
- Navigate towards a period of time before you actually deleted the file you are looking for. You can do this by swiping upwards (using two fingers) on the trackpad OR by pressing the Finder window’s up arrow).
- Now that you have found the backup during a time when you haven’t deleted the file yet, press the Finder Window. After that, navigate through the Finder until you have found the file you are actually looking for.
- In order to look at a preview of the file, hit the Spacebar. If it’s the file you actually wish to recover, click Restore.
Recovering Photos You Have Deleted On Your Mac Device
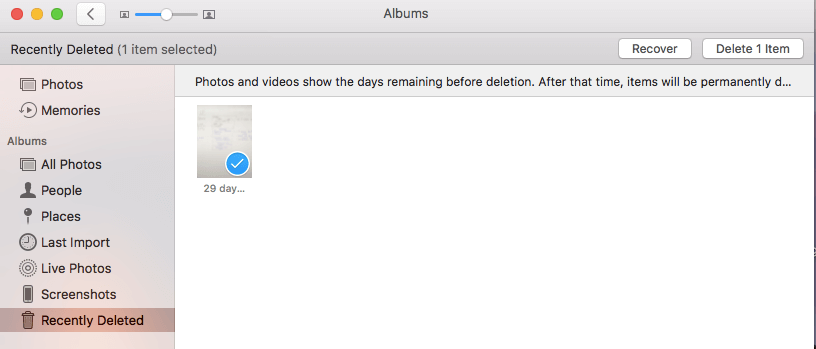
When you deleted a specific photo in your Photos application, it is not removed immediately. It is placed in an album named as Recently Deleted and is kept there for about 30 days. After the 30-day period, it is deleted permanently.
Thus, if the photo you are trying to find has just been deleted within 30 days, then you simply visit the Recently Deleted album. This is located in the Photos sidebar under the Library. You have to click the photo you simply want to restore and click Recover. It will be transferred to your main Library.
Recovering Your Music Data Located In iTunes
Once you delete a particular music or track from your iTunes app, it asks you a question. It queries you if you simply want to move that specific track towards the Trash.
What if you said no? Then, you simply have to fo to Finder. After which, you have to navigate towards your iTunes music folder (usually this is located in Music, then iTunes, then iTunes Media). Locate the file you are looking for and drag it towards the Dock’s iTunes icon.
What if you said yes? The file might still be in Trash. That’s why you have to do the said steps below:
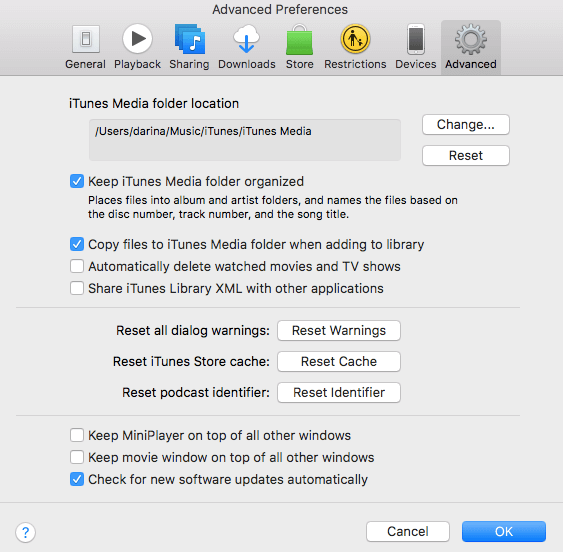
- Open iTunes.
- Select Preferences located within the menu of iTunes.
- Click the tab labeled Advanced.
- Check the box that states that you copy the files to the iTunes media folder when it is being added to the Library.
- Quit Preferences.
- Drag the selected file towards the Desktop (from the actual Trash).
- Drag it then towards the Dock’s iTunes icon.
- After it has been imported, drag the selected file towards the Trash (from your desktop). A copy has been created and it has already been added towards the iTunes folder.
But what if you have already emptied the Trash after you have deleted the music track from iTunes. Well, you can use the Time Machine and restore the file from there. Just follow the previous steps we have stated above.
Part 3. Restoring Previous Versions Of A Specific Document
How to recover deleted files on Mac if you are useing a previous versions of a specific document? There is a specific feature on macOS called versioning. Apps on the macOS such as Preview and TextEdit has this feature in it. Plus, iWork apps and other third-party applications have it too.
What does versioning mean? Well, it just means that when you open a specific file and edit it to your liking, your macOS keeps a copy of the previous versions. In this way, you can simply revert back to the previous versions if you need to.
You can use it by following the steps below:
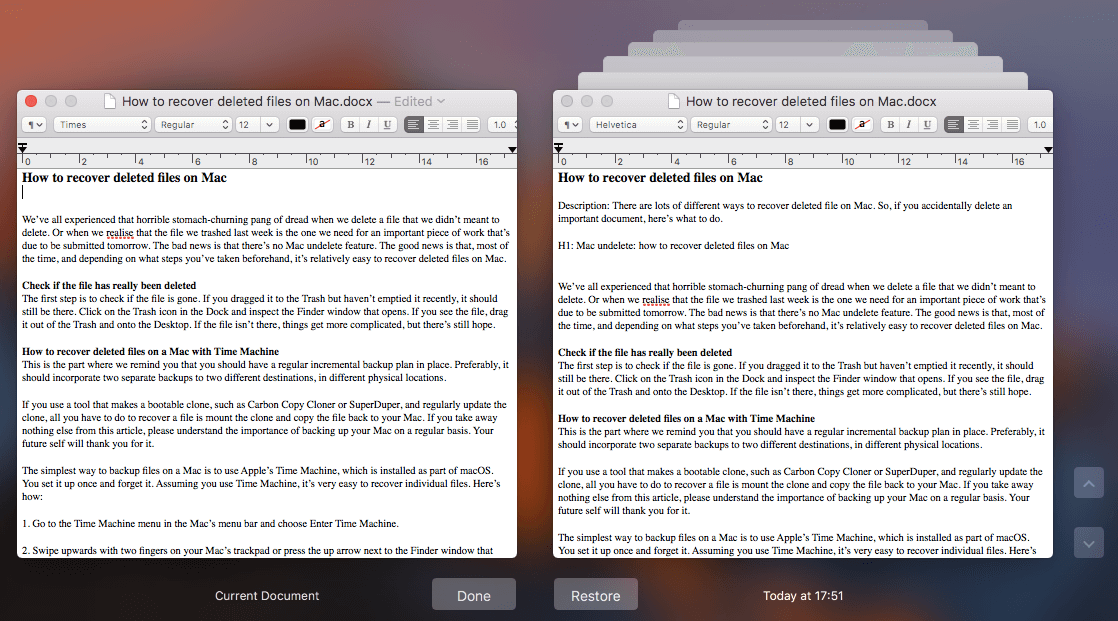
- Open a specific file.
- Press the File menu.
- Select Revert.
- Browse to various versions displayed there. You will be able to see the screen changing and it looks similar to that of the Time Machine.
- In order to locate the versions, you want to get back to, press the tick marks located on the right-hand side of the screen. You can also press the title bars of the various documents located on the right-hand side of the screen. Another option would be to press the up arrow located, again, on the documents’ right side.
- The date of every version will be shown under its preview. If, in case, the preview of the document doesn’t show up, press Load Version. This will download from the iCloud platform.
- Once you find the version you wish, press Restore. This will open the file as a new document. After this, you should press and hold the Option key. Then, choose to Restore a Copy.
If you launch a specific document and edited it and then realized that you don’t want it to be saved, simply visit the File menu. After which, choose Revert To. And then, select Last Opened.
If you open a document, make changes to it, then decide you don’t want to save them, go to the File menu and select Revert To, then Last Opened.
Part 4. How to Recover Deleted Files on Mac without Using Time Machine
What if you don’t utilize a Time Machine? Well, it’s not the end of the world. However, it’s high time that you use the said tool. It’s one of the easiest ways to help you recover files you mistakenly delete.
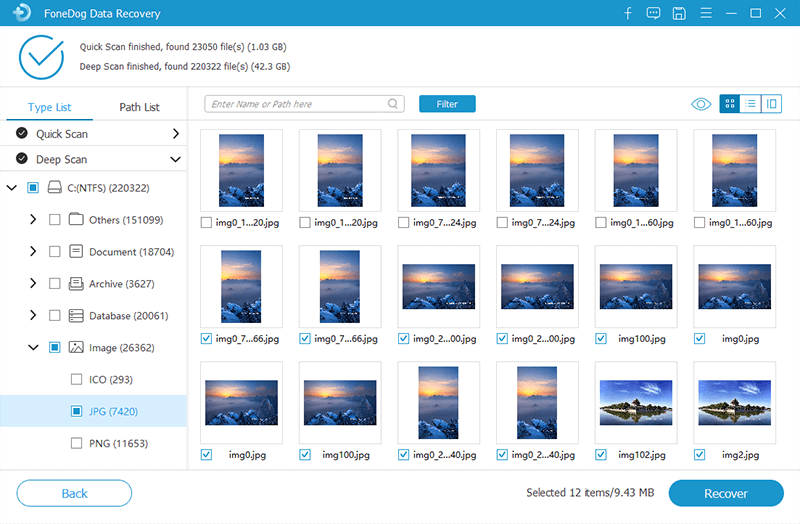
What you can do is to use a Mac data recovery software like FoneDog. This software usually scans your entire Mac device for files you have deleted. It also gives you the ability to specify the type of file you’re locating. For example, you can specify if you want a document, file, video, audio, or image. This Mac data recovery software displays all the files you have previously deleted and you can preview them one by one.
The main thing you have to remember that when you use a data recovery software and when you realize that you lost a file, you should immediately stop utilizing your Mac device. It’s because when you empty the Trash, the files contained within it aren’t immediately deleted. The actual reference to these files within the file index is just removed to give you free space (which it has previously occupied).
If you immediately stop utilizing your Mac, these files will not be overwritten. In this way, the data recovery tool will have a higher chance of recovering the file you need. When you use your Mac, the longer it takes, the higher the chance of the data being overwritten.
The Last Option
When all of the things above didn’t work, your last option would be to go to a data recovery specialist. These people or companies usually use special software in order to reconstruct your lost files.
This is very time-consuming. Plus, you have to take in the effort to collaborate with a specialist. If your file is really important, then you should consider doing this. If the rewards outweigh the risks, then you should seriously try this option.
Part 5. Safely Deleting Files with PowerMyMac
Though you have already known how to recover deleted files on Mac, it's necessary for you to learn safely delete files. If you simply want to delete your files and stop worrying about deleting the wrong data, it is recommended for you to use a tool such as iMyMac PowerMyMac.
Here’s why:
- It gives you the capability to delete unimportant data on your Mac device. In this way, it releases more storage and speeds up the performance of your Mac because files that clog it are removed.
- It provides you with the capability to preview the system status of your Mac devices. You can check a variety of statuses such as CPU, Disk, Memory, and other systems.
- It helps you to powerfully scan your entire device leaving no unnecessary file behind.
- The entire process of scanning your device and deleting unnecessary data can be done in a few simple clicks.
- It provides a display of different data. Plus, you can sort these files by date, time, size, etc. You can even preview the data before actually getting to delete them.
- You are in control of everything. You can choose which files to keep and which files to actually delete.
- It provides you with the entire tool for the first 500MB of data without having to pay for it. Thus, it comes with a free trial.
- You can use the tool first and try it out without having to pay for it.
- It gives you outstanding support through email. A one on one mode of support is also available.
Here’s how to use it to delete files such as old backups. Just follow the steps below:
- Download and install PowerMyMac from our official website and launch it.
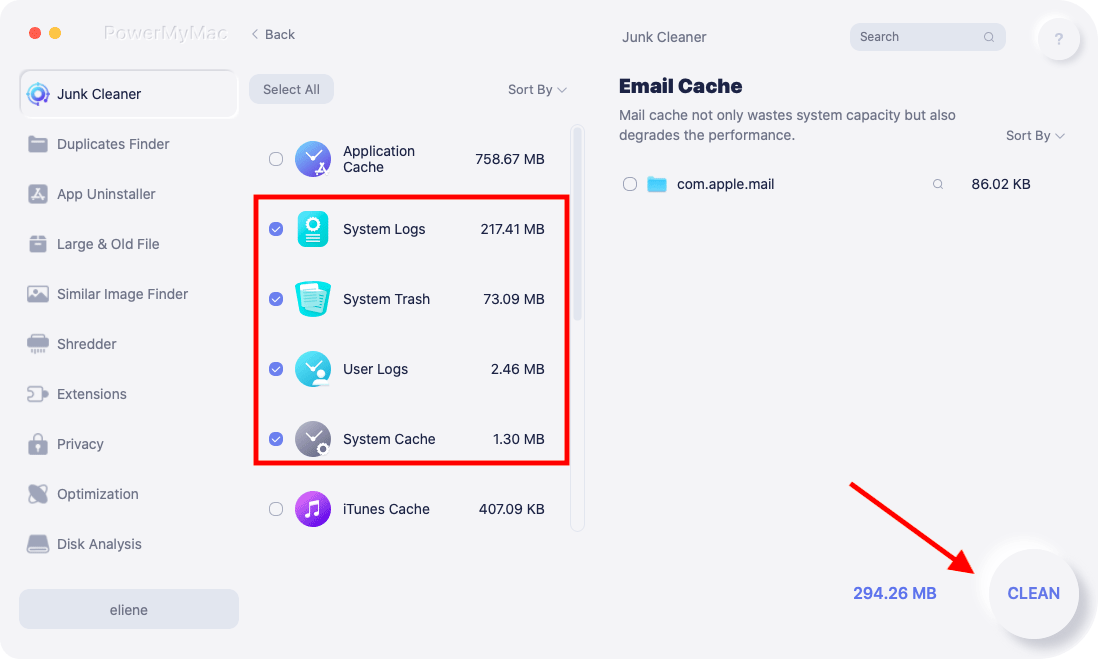
- Open the tool within your device. Press Junk Cleaner. This can be found on the left side of the interface.
- Click the SCAN button. Wait until the results are out.
- It will show the unnecessary files in a variety of categories. Select a specific category. Preview the files in the category you selected.
- Select all or select some files you wish to delete.
- Press the CLEAN button. Wait until the entire cleanup process is finished.
Repeat steps 01 to 06. In this second and third round, select Duplicate Finder or you can also select Large & Old Files instead of choosing Junk Cleaner.
Part 6. Conclusion
Recovering data from a Mac device is actually easy and it requires you to do a few methods. You just have to check out our guide above on how to recover deleted files on Mac.
As such, if you want to clean up your Mac and want to avoid deleting important files (which you may or may not recover), it’s best to use iMyMac PowerMyMac. The benefits of this tool outweigh the cost of actually purchasing it. Plus, you can try it first for free.

