


Facetime is Apple’s video chat application. It comes in pretty handy when you need to contact someone who is also using an Apple device. The thing is, it’s not spared from issues. There is a possibility that you will face the issue of Facetime not working on Mac.
Just like any application, it’s not perfect. It could run into some issues as well. Nonetheless, there are a couple of solutions that you can run to in case you are faced with the issue of Facetime not working on Mac. Continue reading because you will learn how to resolve the issue of Facetime not working on Mac here.
Contents: Part 1. Why Facetime is Not Working on Mac?Part 2. How to Fix Facetime Not Working on Mac?Part 3. Conclusion
Part 1. Why Facetime is Not Working on Mac?
FaceTime is a useful application. It’s a great way to interact with friends and colleagues. You can make and receive video calls with other iPhone, iPod, and iPad users. You can do that without having to use up your allotment or your minutes on your phone plan. It’s pretty easy to set but once in a while, it could run into some issues. The issue of Facetime not working on Mac is pretty much one of those inevitable issues.
Why is my Facetime not working? There are possible reasons:
- Network problems, slow Internet speeds, or no Internet connection.
- Invalid or incorrect settings on your Mac device that cause the FaceTime application to malfunction;
- FaceTime account or Apple account-related issues.
- FaceTime errors that may occur after updating macOS.
- Random system errors, etc
For starters, your internet could be the culprit. You’re probably not able to connect to it because you need to flush the DNS (Domain Name System) cache.
DNS what? There really is no need to explain what DNS is because that’s another topic in itself. In relating it to connectivity issues of your internet, it’s about cleaning out the digital tracks or cache that have accumulated from all the websites that you have visited on your Mac. Don’t worry. There’s nothing technical about this when you get to the solutions.
You also need to consider that Facetime is not available in countries such as the United Arab Emirates, Saudi Arabia, Egypt, Jordan, and Tunisia. So, if you’re in one of those listed countries, don’t expect Facetime to work.
Another possible reason is that there’s an issue with the Apple servers. It could also be that Facetime is not turned on or might need to be updated.
These are just a couple of reasons why Facetime is not working on your Mac. The good news is that you will find a list of solutions below. So, keep reading.
Part 2. How to Fix Facetime Not Working on Mac?
Below are the 9 solutions that you can use if Facetime is not working on your Mac or even other PC devices. Read on to learn more about them.
1. Flush DNS Cache to Solve Internet Connectivity Issues
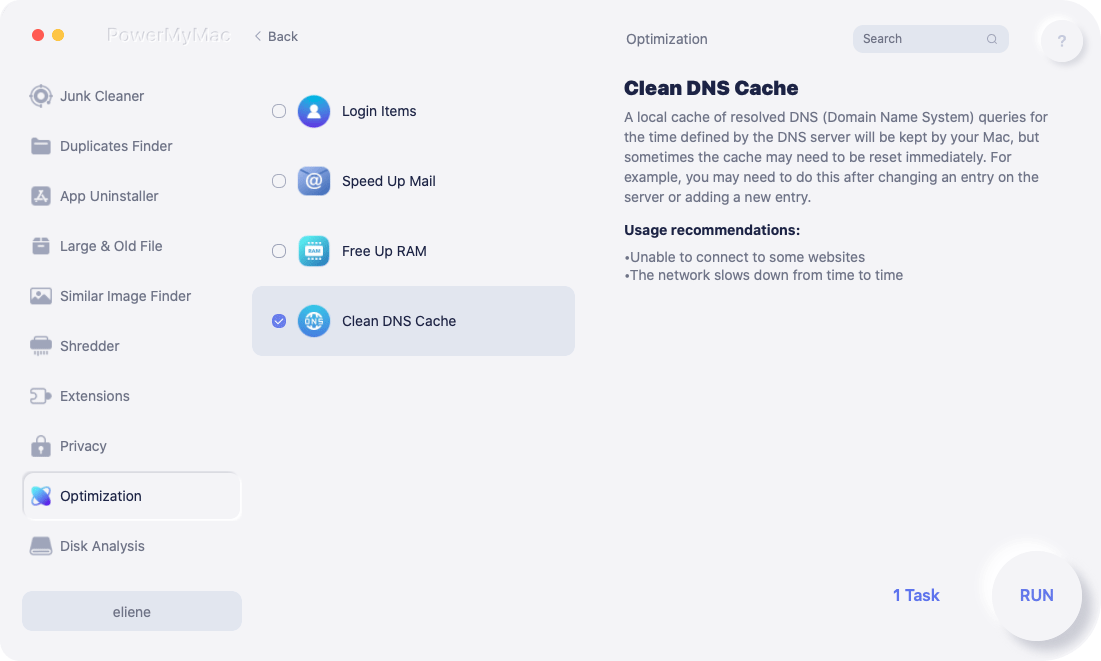
As promised, there is nothing technical about DNS when it comes to internet connectivity. As a matter of fact, you don’t even need to dig deep to know more about it. All you need is the iMyMac PowerMyMac to help flush DNS cache. That way, it can solve the problems you’re having the network.
PowerMyMac is a very easy program to use. It’s a very powerful tool that can help clean and optimize the performance of your Mac. The simple steps below will show you how to use it.
- Download the PowerMyMac from iMyMac for free
- Click on the "Optimization" module
- Click on the SCAN button
- Choose the "Clean DNS Cache" function
PowerMyMac gives an option to try out the program for free. If Facetime isn't working on your Mac, try the PowerMyMac tool to solve the Internet ptoblems by flushing DNS cache.
2. Check for Internet Connection
It also wouldn’t hurt to check on the internet connection of your Mac. To check on your internet connection, you can either look at the internet icon on the top, right-hand side of your screen or follow the steps below.
Step 1. Click on the Apple Menu
Take your cursor to the menu on top and select the Apple icon and click on it.
Step 2. Click on System Preferences
Click on System Preferences from the drop-down menu. The System Preferences window will appear on your screen.
Step 3. Click on Network
Take your cursor to the Internet & Wireless area and click on Network. Another window will appear on your screen.
Step 4. Check Internet Connection
Once you’re seeing the Network window, you can check your internet connection by looking at the left-hand side of the window.
3. Make Sure Apple Servers aren’t Down
You could also check on the Apple Servers. For all you know, they’re down. Here the steps on how to check on the Apple Servers.
Step 1. Go to Apple Support
You can go to Apple’s website and click on Support on the top menu.
Step 2. Type in System Status
When you get to the Support page, you will see a search field where you can type in System Status. Hit Enter once you have done so.
Step 3. Launch the System Status Window
Once you hit Enter another page will appear. Click on the first link that you see. The System Status page will appear on your screen. Go over the list that you see on your screen and look for Facetime, Check if Facetime has a green circle beside it. if it does, then it’s good. If it doesn’t, then that could be causing the problem and you would just have to wait until Apple resolves it.
Step 4. Use a Website called Down Detector
Check on the status of the Apple Servers by going to a website called Down Detector.
4. Make Sure Facetime is Turned on
To make sure that Facetime is working, check if it is turned on. The steps below will show you how to see if Facetime is switched on.
Step 1. Launch Facetime
You can launch Facetime from the Dock or the Applications folder. Once you see it, click on it.
Step 2. Go to Preferences in Facetime
Now that Facetime is launched on your screen, click on the Preferences tab. This is the tab that you see beside the Email tab on the top part of the screen.
Step 3. Check if Facetime is Turned On
Now you can check is Facetime is turned on by going under Preferences and looking at the tab beside Facetime. It should be turned on. If it’s not, slide the button to turn it on. You can also use this tab to reset Facetime.
5. Check if the FaceTime App is Updated
If Facetime is not working on your Mac, then it’s probably time to check for updates. The steps below will show you how to check for software updates on your Mac.
Step 1. Go to the App Store
To go to System Preferences, you need to click on the Apple icon you see on the top menu. Once you click on it, you will see App Store underneath System Preferences on the drop-down menu. Click on App Store.
Step 2. Click on the Updates Tab
Once you click on App Store from the drop-down menu, a window will appear on your screen. On that window, you will see an Update tab. Click on it.
Step 3. Check for Update
A list of updates will appear on the screen once you have clicked on the Updates. Click on the Update tab beside each software to start updating.
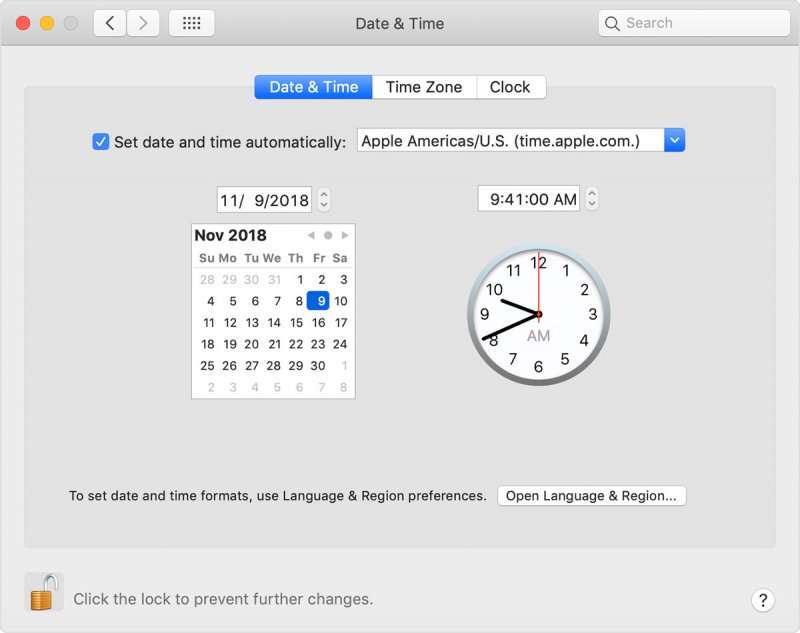
6. Make Sure that Date & Time are Correct
You also need to make sure that the date and time on your mac are correct. To check on them, follow the simple steps below.
Step 1. Click on the Apple Icon
Go to the Apple icon on the top, left-hand side of the screen. Click on it and choose System Preferences.
Step 2. Click on Date & Time
Now that you’re seeing the System Preferences window on your screen, look for Date & Time and click on it.
Step 3. Check Date and Time on Your Mac
You will soon be taken to another window where you can check on the date and time. If it’s not showing the correct date and time, you can start adjusting both on that same window. However, you would need to click on the padlock icon to make changes to the date and time on your Mac.
7. Verify Your Email Account
One of the reasons as to why Facetime is not working on your Mac is that you haven’t verified your email yet. This can happen if you’re using more than one email address and you have not seen the verification email yet. To check on the email address that you have listed down on Facetime, follow the steps below.
Step 1. Launch the Facetime
Launch the Facetime app by clicking on it from the Dock. You can also click on Command + Space to start it.
Step 2. Go to Preferences in the Facetime
Once the facetime app is launched on your screen, click on Preferences. A new window will appear and from there, you can check on the email address that you have listed down.
Step 3. Verify Email
Now, open your inbox that corresponds to the email address that you have listed down on Facetime. Look for the email from Apple and click on the link to verify your email address.
8. Make Sure You’re Using the Right Apple ID
Your Apple Id is essentially your gateway to the number of services that Apple provides. You need to make sure you’re using the right Apple If for Facetime. The steps below will show you how to check if you’re using the right Apple ID.
Step 1. Launch Your Facetime
Click on the Facetime icon on your Dock. You can also use Spotlight to launch the Facetime app.
Step 2. Go to Preferences
Once the Facetime app is launched on your screen, take your cursor to Preferences. You will see this on the top part of the Facetime app. Click on Preferences.
Step 3. Check Apple ID
Once you click on Preferences, a new window will appear. From there, you can check is the Apple ID you’re using is correct. If not, you can sign out and back in again with the correct Apple ID.
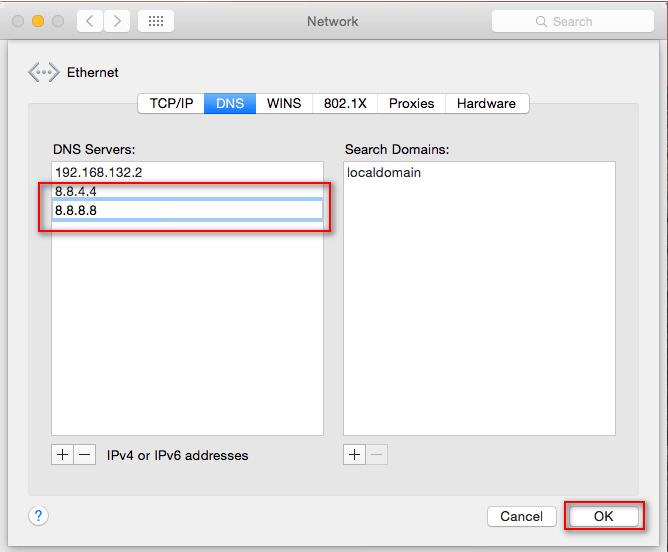
9. Change the Settings of DNS
You can also try changing the settings of DNS. The steps below will show you how to do it.
Step 1. Launch the System Preferences Folder
Take your cursor to the menu on top and click on the Apple icon. A drop-down menu will appear. From there, click on System Preferences.
Step 2. Click on Network
Now that you’re inside the Network folder, click on Wi-Fi. You will see this on the left side of the Network folder. Then click on Advanced. Look for the DNS tab and click on it.
Step 3. Change DNS Setting
Look for the + sign at the bottom part of the window. Click on it to add either IPv6 or IP4 server addresses. Then click on the OK tab.
Part 3. Conclusion
In case your Facetime is not working on your Mac, you can try out the various solutions listed above. Keep in mind that the iMyMac PowerMyMac can do a lot to keep your Mac working in top condition. A good working Mac is exactly what you need to keep Facetime working all the time.
Have you ever had an issue with Facetime? How were you able to resolve it? Feel free to share some of your tips. Our readers would love to hear from you.

