


When your Mac Finder slows down or turns unresponsive, you wonder if it is because your system has run out of application memory. A tired Finder makes it slow to launch folders or crashes randomly. Lots of Mac owners have experienced this issue if they update Mac to the latest macOS version.
Finder keeps file management and navigation at your fingertips but its malfunction diminishes your workflow efficiency. But don’t panic and remember identifying the root cause is more time-consuming than troubleshooting it.
In this piece, we’ll explore a few common causes and quick fixes to tackle the ‘Finder Not Responding’ issue head-on.
Contents: Part 1. Bogged Down Finder but Still OperationalPart 2. Finder Becomes Completely UnresponsivePart 3. Other Options to Fix Finder Not Responding on MacPart 4. Final Words
Part 1. Bogged Down Finder but Still Operational
Follow these tips if you rely on Finder to launch folders or retrieve files and the process slows down. Find the common causes and fixes below.
1. Your Mac Is Hit by Storage Shortfall
At the outset, make sure your Mac disk boasts at least 20% unclaimed space at the ready for use. On the contrary, your machine’s performance hits the wall. To view storage usage readings, tap on the Apple trademark on the upper left of your display, and choose About This Mac, then hit Storage tab. Here, you get a bird’s eye view of the storage with a vibrant bar in the background.

Quick Fix by Reclaiming Disk Space
If you’ve storage deficit, the most effortless way to reclaim disk space is to use iMyMac PowerMyMac. It’s a dedicated tool fashioned to quickly pinpoint and purge junk or redundant files.
We also suggest PowerMyMac to zero in on supermassive or obsolete files for deletion. You can also invoke the app to pinpoint replicated files if you've got a penchant for storing multiple versions of backups or photos on Mac.
In all spruce up your Mac regularly to free up tons of disk space and optimize the overall performance. Best of all, the Finder’s sluggishness may disappear as well.

2. Spotlight’s Indexing Underway
After you complete importing mass files from an external drive to your computer, Spotlight must index all fresh items for you to locate. As Spotlight indexes, your Mac slows down, overheats, and the Finder app hits the snag.
To check if Spotlight is indexing items, hit the search icon on the upper right corner, enter any file name, and check the current status.
If you can’t wait, you can either toggle off Spotlight or remove some files from indexing.
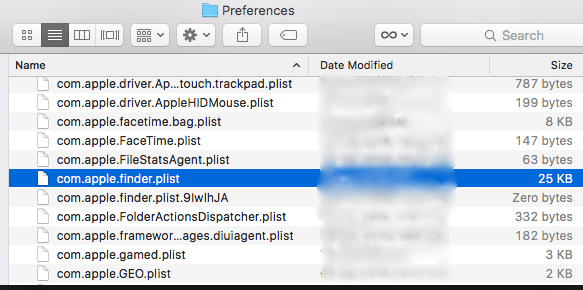
3. Rogue Finder Preference Items
At times, the preferences files affiliated with the Finder tool can corrupt or compromise core data leading to malfunctions. To pull it off, you’ll need to erase Finder Preferences.
- Search for:
~/Library/Preferences/under the Spotlight bar, and tap on the “TOP HIT” results to launch the Preferences - In the fresh window, pinpoint this file:
com.apple.finder.plist, right-click and choose “Move to Trash”. - Now shut down the folder and restart the machine. It’s innocuous to erase a .plist file as every reboot regenerates a Finder’s preference file automatically.
Other Causes
Other causes of a dysfunctional Finder include corrupted configurations, broken preferences, profile in error state or third-party plugins. At the outset, you’ve to unlock the root cause to avoid plodding through fruitless and complex troubleshooting unknowingly.
Onto third-party plugins, Apple strongly admonishes against un-published plugins embedded into your system. Ignore this at your own risk as it triggers issues such as an unresponsive Finder.
Part 2. Finder Becomes Completely Unresponsive
At this juncture, your Mac’s Finder app should become unresponsive or untraceable. The command line unveils a powerful instrument to do the job if everything else amounts to nothing. At times, the Finder file is compromised and needs to be erased.
However, a stalled Finder means you can’t find your way to the path and get rid of it with the UI. Thus, you should invoke the Terminal.
Purge Corrupted File with Terminal
- Launch the Terminal App via the Launchpad.
- Next, enter the following command path and hit Enter :
sudo rm ~/Library/Preferences/com.apple.finder.plist
- Restart your machine to test the waters.
Use Terminal to Wipe Away the Preference File
You have to run Terminal command to purge the preference file to get things back to normal.
Follow this step-by-step guide:
- Launch the Terminal app. Access via a fast Spotlight probe or search the tool in Applications > Utilities and launch it.
- Erase the main Finder preference file. Under the Terminal prompt, enter the following command in verbatim and hit the Return button on your keyboard:
rm ~/Library/Preferences/com.apple.finder.plist
- Next, restart your machine for the tweak to take effect.
Part 3. Other Options to Fix Finder Not Responding on Mac
Re-launch Finder via Task Manager
You can fire up your Finder again by quitting it forcefully and then check if runs normally.
Launch Task Manager by holding down Option + Command + Esc. From the list of active apps, tap on Finder and then hit “Relaunch”.
Alternatively, force quit the Finder app as the active Window. Tap the Apple Logo →Hit the Force Quit Finder. Wait for a while, and then fire up the Finder.
Try Logging out and Log in
Logging out and in your Mac halts all the active processes and restarts them when you log in. Ensure you Log Out not locking your Mac. To Log Out, click on the () Apple Logo and then hit on the last preference “Log Out.”
Part 4. Final Words
The Finder not responding on Mac mostly hits anyone who upgrades to the latest macOS version. It’s a nightmare scenario as the app provides a quick flight path to files or folders. But take it easy, sometimes, a mere Force Quit or Re-launch will give Finder a new lease of life.
I hope the tricks above helped put the issue off your chest. The Finder app comes in handy to run a tight ship by taking control of your Mac files.
Last but not least, we invite savvy readers with insider insights to weigh in and we’ll update this article to throw in their nifty tricks.


special2022-02-24 14:33:16
It doesn't work simply trying to force a stuck finder window to relaunch