


Paperless is the way to go. If you’re a remote worker, you know this pretty well. However, there are still times when you will need to print out some stuff.
So even if you’re working remotely, you would still need to learn how to add printer to Mac. You can never go wrong if there is a printer added to your Mac. It will save you some precious moments when you need to print out something right away.
Article GuidePart 1. What You Need to Know Before Adding Printer to MacPart 2. How to Add Printer to MacPart 3. How to Uninstall Drivers of Old PrintersPart 4. Conclusion
Part 1. What You Need to Know Before Adding Printer to Mac
There are a couple of things you need to know before you add the printer to Mac. The first thing to consider is the kind of printer you will be adding. Knowing the kind of printer you will be using is crucial because it will determine which method you will use to add it to your Mac.
If you’re adding a newer model, there’s a big chance that it supports AirPrint. If you’re still not aware of what AirPrint is, it’s a feature on iOS and OS X devices that enable the user to print without the need for a driver.
All you will need is a device with an AirPrint and AirPrint compatible printer and a wireless network. For the AirPrint compatible printer to work with your Mac, you would need to connect the two to the same Wi-Fi network.
If you are using the AirPort Base Statin router, just follow the steps below.
Step 1. Open Airport Utility
You need to open Airport Utility. To get to it, you would have to go to your Applications folder. From there, click on Utilities to see Airport Utility.
Step 2. Choose Base Station
Choose your base station and enter your password. Go to the menu bar and select Base Station. Then click on Add WPS Printer.
Step 3. Choose WPS Connection
Choose the type of WPS connection. You can either go for a PIN or First Attempt. After choosing one, click Continue. When you’re done, just exit AirPort Utility.
The other kind of printer that you might want to add to your Mac is one that requires the installation of drivers. Before you can install them, you would have to download the drivers from the internet first. Nonetheless, this article will show you how to add a printer to Mac, be it a Wi-Fi printer or not.
Part 2. How to Add Printer to Mac
You will find two methods below. The first method will show you how to connect a Wi-Fi printer to Mac and the second will show you how to connect a regular printer to your Mac. Read on to learn more about them.
Method #1. Adding Wireless Printer to Mac
As mentioned previously, you would need your Wi-Fi compatible printer connected to the same network as your Mac. Before you move on to add it to your Mac, connect both devices to the same Wi-Fi network first. Then go on and read the steps below. They will show you how to add a Wi-Fi printer to Mac.
Step 1. Navigate to System Preferences
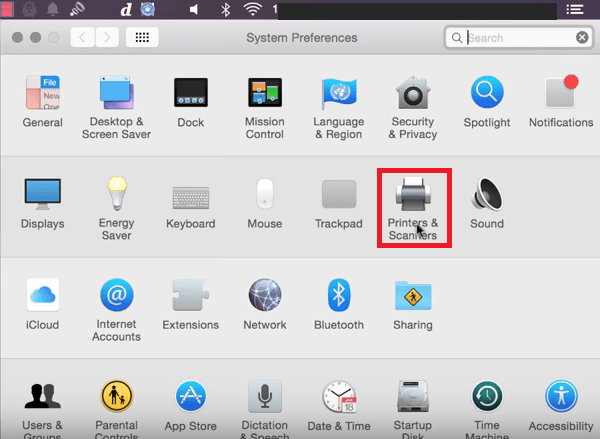
Take your cursor to the menu on top. Hit that Apple logo. Select System Preferences from the drop-down list. Once you’re inside the folder of System Preferences, click on Printers & Scanners.
Step 2. Add Printer
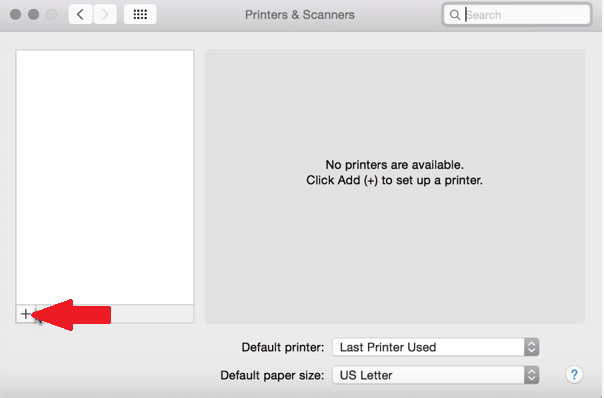
Once you’re inside the Printers & Scanners folder, click on the + icon you see on the left part of the screen. You should be able to see the printer that you want to add. If there is more than one printer showing up, select the one that matches the model that you want to add. If it’s not showing, then you might want to make sure you’re on the same Wi-Fi network.
Step 3. Check Printer
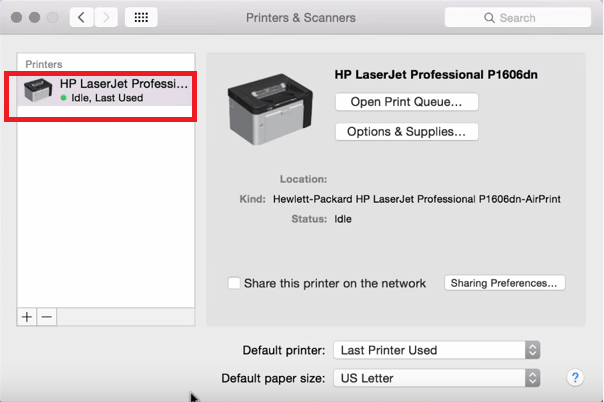
Once you have added a printer to your Mac, you will see the model listed down under Printers on the left-hand side of the screen.
Step 4. Test Print
Your printer is ready once you see a green dot underneath the name of your printer. You can do a test print by opening a document and going to File on the menu bar on top. Then select Print from the drop-down list and click on it.
Method #2. Connecting a non-Wi-Fi Printer to Mac
If you’re using a regular printer, the steps below will show you how you can add it to your Mac.
Step 1. Go to the Apple Logo
Take your cursor to the top menu and click on the Apple logo. Select System Preferences from the drop-down list.
Step 2. Go to Printers & Scanners
Once you’re inside the System Preferences folder, click on Printer & Scanners. You will be taken inside the folder of Printers & Scanners.
Step 3. Add Printer
Now that you’re inside the Printers & Scanners folder, look at the left-hand side of the screen. if you have other printers added to Mac, you will them listed down under Printers. To add another printer, just click on the + sign you see at the left bottom part of the page. Once you click on it, another window will pop up and from there, you will see three options as to how to add a printer to Mac.
These three options are Default, IP, and Windows. Click on default. Click on default for the printer to automatically populate. You want to use a driver installed on the computer. If you don't have the driver, go ahead and just hit Auto Select so that the next time your computer updates, it will download the correct driver. Then click on the Add tab you see on the right, bottom part of the screen.
Step 4. Use the Default Option to Add a Network Printer
You can also use the Default option to add a network printer. Then use the same steps when adding a wireless printer.
Step 5. Use IP Address
If in case your printer doesn’t show up in the Default setting, you can connect it using the IP address. That means you would have to find the IP address of your printer. To find the IP address of your printer, you can the built-in CUPS web-based interface.
Open up the Safari browser and type localhost:631/printers. You will be able to find all the detailed information you need regarding the printers installed on your system.
Part 3. How to Uninstall Drivers of Old Printers
You can add more than just one printer to your Mac. However, there is a downside to that. It might use up a lot of space on your Mac. That is why it’s wise for you to uninstall drivers of old printers or any printer that you are not using anymore.
While that sounds like a tedious thing to do, you can always use the iMyMac PowerMyMac to help you uninstall those unneeded programs. It not only helps you uninstall programs that you don’t use anymore, but it also cleans out the junk files that could be taking up precious space on your Mac.
Making sure that your Mac has enough space is one sure way of making the printer work well. The steps below will show you how you can use the PowerMyMac so that you can easily get rid of those unneeded drives on your Mac.
- Download the iMyMac PowerMyMac
- Choose the Uninstaller Module
- Do a Scan
- Clean up Mac
The steps are more detailed. Read well to understand how you can use the PowerMyMac:
Step 1. Download the PowerMyMac
To download the PowerMyMac, you can just click here. Once you get on the PowerMyMac page, click on the free download button.
Step 2. Choose the Uninstaller Module
You will see the list of modules on the left-hand side of the screen. Select Uninstaller from the list and click on it.

Step 3. Do a Scan
Once you have clicked on the Uninstaller, you will see the Scan button on the main screen. This means that the PowerMyMac is all set to scan your Mac. Just click on the Scan button. Wait a couple of seconds for the scan to finish. It won’t take long.
Step 4. Clean up Mac
A list of programs will appear on your screen when the scan is done. Look for those drivers that you need to uninstall. Check on them. Then click on the Clean button on the bottom part of the page.

Part 4. Conclusion
It’s not that hard to add a printer to Mac. You just need to know what kind of printer you’re going to add to your Mac. Keep in mind that your Mac can only take so many printers. Make sure to clean out the ones that you don’t need anymore. To do that, you can always use the iMyMac PowerMyMac.
What printer did you add to your Mac? We would love to hear from you.

