


WD Discovery is on a lot of external hard drives from Western Digital. It’s preinstalled on a few of their external SSDs (Solid State Drives). However, there are complaints in regards to the external hard drive not working or not being recognized.
For other users, might have found another similar app and want to remove the app. To uninstall WD Discovery on Mac, read the following parts to be guided.
Contents: Part 1. What is Discovery on Mac?Part 2. How Do I Uninstall Western Digital Discovery on Mac?Part 3. How to Uninstall WD Discovery on Mac Automatically?Part 4. Conclusion
Part 1. What is Discovery on Mac?
Before we learn how to delete WD Discovery, let’s see what is this app all about. WD Discovery is a software that is the disk management platform from Western Digital.
You can link your social network accounts with WD Discovery and WD Smartware. Such as Instagram and Facebook, then install your digital assets. Keep a copy of your social media images and put them on your Western Digital external drive. You can also link to online storage providers such as Dropbox, Google Drive, and OneDrive. And then save those items to the external drive that is connected to your computer.
Part 2. How Do I Uninstall Western Digital Discovery on Mac?
You can use a manual cleanup solution to uninstall WD Discovery on Mac. For skilled users, it may be possible, but it is not really recommended for newbies. The procedures below will assist you in uninstalling WD Drive Utilities:
- Go to the Finder menu and click Go > then select Utilities.
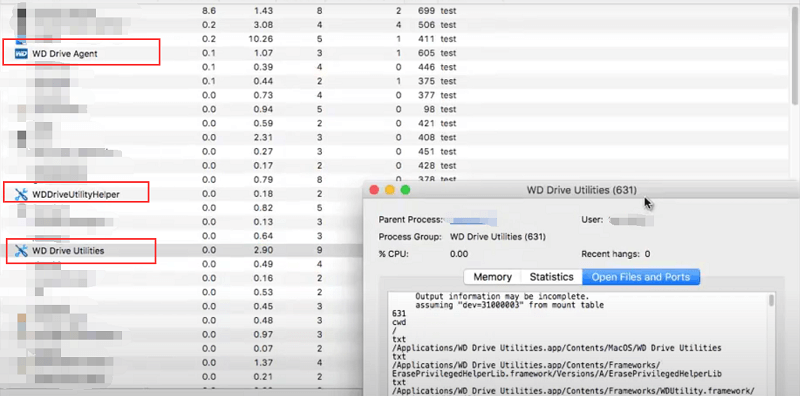
- Double-click the icon of Activity Monitor to open it.
- Find the entries for WD Drive Utilities, WD Drive Agent, and WDDriveUtilityHelper on the main pane of Activity Monitor, simply pick them and select Quit Process.
- Return to the Finder and go to the Finder menu and pick Go > Applications. Locate the icon of WD Drive Utilities, right-click it, and choose Move to Trash from the menu. If a user login is needed, type the password in.
- Then, while selecting Finder's Go, hold down the Option key. Choose Library. Find and drag any folders with the names listed below to the Trash.
- On the Terminal, utilize the "rm" function to remove the WD Drive Utilities files/folders (They are usually found in
/Library/Preferences/,/Library/Application Support/,/Library/Caches/) - Reboot Mac OS X to completely uninstall WD Discovery on Mac.
Remove WD Discovery from Mac Using Its Uninstaller
Uninstallers are included with some editions of the WD Discovery software. And while this will help you how to uninstall WD Discovery on Mac partially, it will not totally remove it.
There can be a few more things you should do to clean up the device after using the uninstaller provided by Western Digital. To ensure that WD Discovery is no longer present.
- Open the Applications folder in a Finder window. When you choose to launch a Finder window, it will appear. In the window's sidebar, select Applications. This will bring you to the Applications folder on your computer.
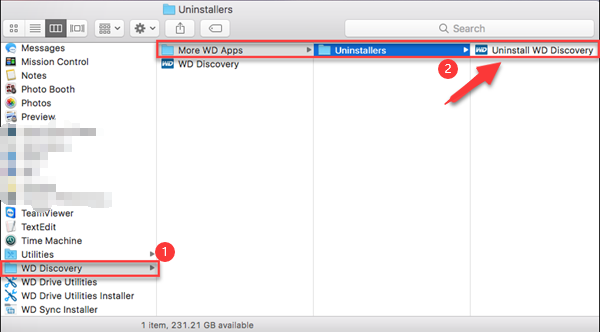
- Scroll down to find out more. After that, select the WD Discovery Directory. To access a folder, simply click on it. Then select More WD Apps from the drop-down menu. You'll discover an Uninstallers directory within. To open this folder, simply click on it. If the edition of the WD program you downloaded doesn't come with an uninstaller, you'll need to download one. Then scroll down to choose another approach to uninstall WD Discovery from your Mac.
- Uninstall WD Discovery by clicking the Uninstall button. This launches the WD Discovery Uninstaller on the Mac. Then you press the Uninstall option.
- Enter the Administration Account for the Mac. Your Mac device will prompt you to verify the modification. To confirm, enter in the Mac user administration credentials. The uninstaller software will then be launched on the Mac. At the completion, you can see the notification "Uninstall Successful."
- Then remove the Library Files and Discovery Folders. The uninstaller has completed some of the work, but not all of it. Before WD Discovery is entirely gone, the Mac would still have items that need to be cleaned out. To completely uninstall WD Discovery on Mac, you should also delete its related files.
Part 3. How to Uninstall WD Discovery on Mac Automatically?
Manually uninstalling the app will be a hard way especially for beginners. In this way, you can uninstall it easily and quickly.
You can download iMyMac PowerMyMac for free and use it to intelligently uninstall software on Mac like Adobe, Office, and OneDrive, and you can also clean all kinds of junk files and cache on Mac.
For you to be guided on how to automatically uninstall WD Discovery on Mac using PowerMyMac, read the instructions below:
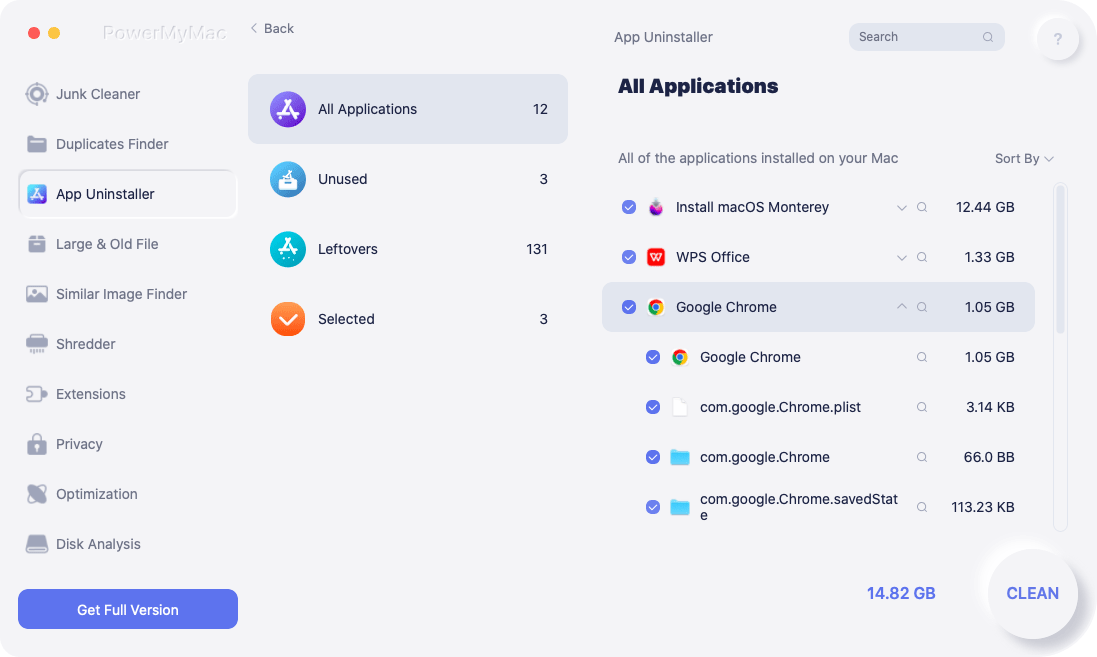
- Open the PowerMyMac software.
- Press SCAN after selecting App Uninstaller.
- When the scanning is complete, all downloaded programs will be found on the page. You may either browse for and select the WD Discovery or type the name into the search window. Then, all of the WD Discovery folders and files will show on the right side of the screen.
- Choose the app and files you wish to get rid of. When you've decided, click the CLEAN button in the bottom right corner of your screen and wait for the procedure to complete.
- A pop-up window with the words "Cleanup Completed" will show when the procedure is finished.
As you can see, this method makes it easier to uninstall the WD Discovery on Mac completely.
Part 4. Conclusion
This guide has been a great help, especially for users who do not know how to uninstall WD Discovery on Mac. In different ways, you may uninstall it manually or automatically.
As it is difficult for the majority to do everything individually on their own, most have opted to uninstall it using the specialized software, PowerMyMac. Not just it assure to have a quick process, but it also ensures that your device is safe from uninstallation.

