


With the advancement of technology today, various useful features for devices are invented. Whether those features are for personal or professional use, all have one goal to complete tasks faster and more efficient.
Mac devices are one of those devices today that has an up to date features aside from its fast and smooth working system. Now wonder why Mac is one of the most trusted brands of all times. One of the features of Mac devices that some may not know is its text to speech feature. This feature lets your Mac read documents. And what I mean by "READ" is the Mac device will voiceover texts that are selected in the documents for you. Text to speech feature is specially developed for the blinds.
For this feature to be more easy and fast to use, your files on Mac devices must be organized and can be easily located. But do not worry if your files are jumbled, iMyMac- File Manager will help find your files. So read on and do the trick later.
Article GuideSection 1. The Essentials of Text to Speech FeaturesSection 2. How to enable Text to Speech (TTS) feature on Mac devicesSection 3. Find Your Files to Be Read Easily Section 4. Wrapping Up
People Also Read:Best Cloud Backup for Mac to Meet Your NeedsFree File Or Data Recovery Software For Mac Computers
Section 1. The Essentials of Text to Speech Features

Text to speech feature is just one of the best features you have on Mac. Not only because this feature is very useful for blind people or people with poor sight. But also because of these advantages.
- Multitasking
Yes! You can multitask. Save your more time to do other things. You can listen to the document being read while doing other things. For example, listening while you are cleaning or cooking or even when you are doing some exercise. It is just like listening to some music while doing other tasks.
- Save time from reading
Yup, read it twice. SAVES YOU TIME. How? Simply because in the text to speech feature, you can adjust the speed if you want your texts or document be read faster. You can even change the type of voice you want. Also, you can select different languages and dialects you want the texts to be read. But, of course, you have to download extra files for these options.
- Less screen time
If you have to read long documents or articles, then it also means you will be exposed at your Mac screen for a long period of time as well. It will make your eyes sore and tired. With the text to speech, you just have to select the texts to be read and listen.
It is fun to read with your eyes. But there are times that we can also use our ears to have fun with what we want to read.
Section 2. How to enable Text to Speech (TTS) feature on Mac devices
Enable your text to speech feature on Mac with these easy steps. Read and follow for your own risk!
Activating the TTS on Mac:
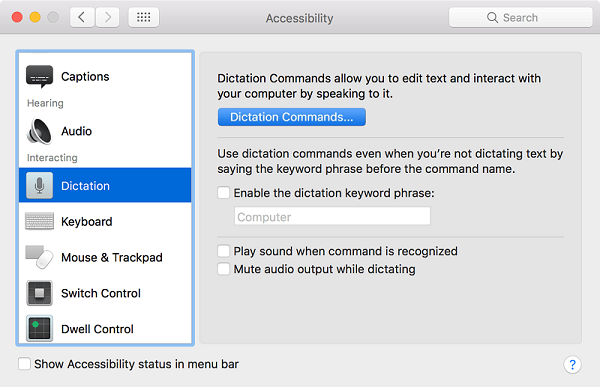
Step 1: Run the Apple icon. and click System Preference. Now, choose the dictation and speech button.
Alternative, after running system preference, select the Accessibility button. Then, choose the Speech button.
Step 2: Select text to speech. Locate the phrase "Speak selected text when the key is pressed".
Note: The type of voice you want can be selected as well as the speed of the speech. Go to Speaking Rate option and adjust to your preference. To do this, go to Apple icon > System Preferences > Dictation and Speech > System Voice > Customize. Now, select the voices of your preference. Confirm by clicking the Okay. The selected voices will now be downloaded and install on the Mac.
Step 3: Select the Set Key option button then select one modifier key that you preferred. Choose between the control key, command, option, and Shift key. Select also additional one key aside from modifier keys.
Example: Control+N, Command+Esc
Step 4: Confirm your selection by clicking the okay button. Fin.
Section 3. Find Your Files to Be Read Easily
Now, it is said and done on how to enable the text to speech feature. Try this little tip on how to easily find files saved on Mac that you want to be read.
Well, we all know the traditional way to do it. You can search using the search bar or going through each folder on the Mac hard drive. Whichever option you choose; both will show your files a little longer than you expect. Most especially if you have lots of files saved on Mac, the search might be very slow.
One of the best resort is to have an application to do the search. iMyMac PowerMyMac is the application that you need. Find the one you’re searching for in just a few minutes.
Tip: The current version does not support the following function temporarily, but a special software that supports the following function will be released in the future.
Follow these easy steps to start searching for your files.
First step: Install the PowerMyMac. You can download the application on www.imymac.com. It will only take you a couple of minutes to finish installing the application. Then, run the application.
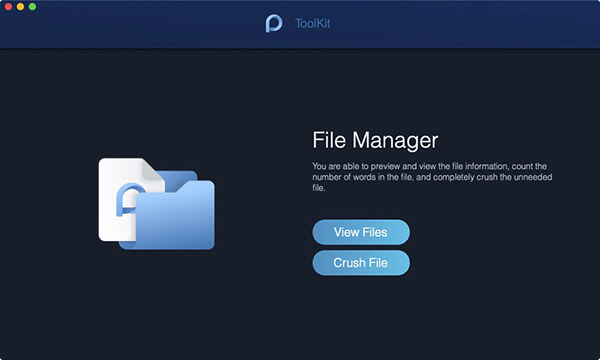
Second step: Go to Toolkit and click the File Manager Tab. Select between Crush File and View File. Since we want to find files you want to read, then click the View File tab.
Third step: Now, drag the files that you want to be viewed directly on the screen. PowerMyMac will now flash the entire details of the files. On the left corner is the file name while shown at the right is the details of the file i.e. path, create, size and last modification.
The PowerMyMac also allows you to compress and decompress files. All you have to do is go to Unarchive on the Toolkit Tab. Drag the file you want to compress or decompress, then you are done. Amazing, isn't it? PowerMyMac is an all-in-one tool. It can be a cleaner and as well as a toolkit for Mac devices.
Section 4. Wrapping Up
Text to Speech is just one useful feature built-in our Macs. It will be more efficient to use if combined with the right application. With iMyMac PowerMyMac, you can now have the best text to speech experience. Search your file with PowerMyMac- File Manager, open, select the texts to be read and press the combination keys. Enjoy!

