


Dr. Cleaner is an effective cleaning tool. But what if I tell you that this cleaning tool can also encounter issues where you will need to uninstall Dr. Cleaner on Mac? Yes, even though it is a cleaning tool, it can still encounter issues.
Here we will show you how to manually remove it. And what to do in order to completely uninstall the apps from your device? You will also need the use of a special cleaning tool. Please check this article so you will be able to know the easy removal ways.
Contents: Part 1. Manually Uninstall Dr. Cleaner on Mac And Delete Its LeftoversPart 2. The Quickest Way to Uninstall Dr. Cleaner on MacPart 3. What is Dr. Cleaner?Part 4. Conclusion
Part 1. Manually Uninstall Dr. Cleaner on Mac And Delete Its Leftovers
Before we teach you the special and easiest way to remove the app Dr. Cleaner for Mac, we will first show you how to uninstall this app using the manual method.
Using the manual method is effective but it can take up lots of your time and effort. But if you really want to use the manual way, you can check this section for the step-by-step guide we have provided.
To manually uninstall Dr. Cleaner on Mac and delete its leftovers:
- Open your Activity Monitor on Mac
- Find and choose Cleaner, tap on X and select Force Quit
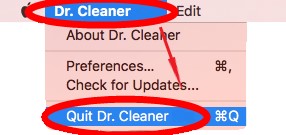
- Or you can click the icon of Dr. Cleaner then select Quit Dr. Cleaner
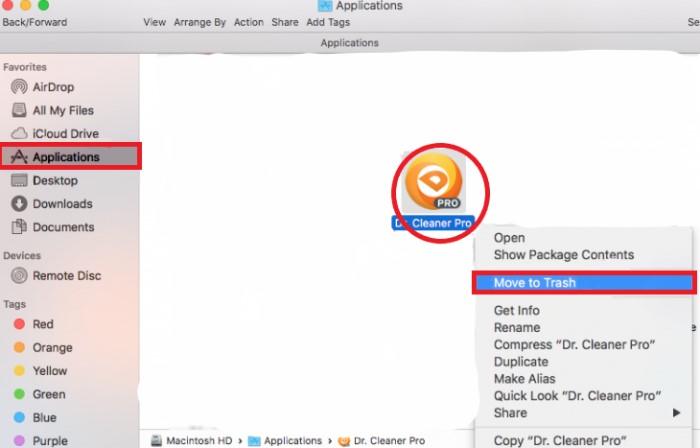
- Open Finder and click Application
- Select Cleaner and drag it to the Trash
- Now if you want to completely uninstall Dr. Cleaner on Mac, delete its other contents. Open Finder once more and select Go > Go to Folder respectively
- Type
~/Libraryand choose Go, look for the files with the words “drcleaner” or “trendmicro” in the following folders:
~/Caches, ~/Application Support, ~/Preferences, ~/Saved Application State, ~/LaunchAgents, ~/LaunchDaemons, ~/StartupItems, ~/PreferencePanes,
- Select all the files connected with Cleaner and drag them to the Trash icon
- Now, right-click on your Trash and select Empty Trash
After that, you will no longer see the Dr. Cleaner app on your device as well as the other data that comes with it. The manual way is very effective. But again, ittakes lots of your time and effort – which is why we still recommend using a professional tool, let’s head over to the next section.
Part 2. The Quickest Way to Uninstall Dr. Cleaner on Mac
If you are looking for another way to uninstall Dr. Cleaner on Mac, then you will need this very special tool, the iMyMac PowerMyMac, which can make things a lot easier for you since this is considered the fastest and the most efficient cleaning tool there is.
As an alternative cleaning tool to the Dr. Cleaner, this software is more professional and it has 9 modules to clean your Mac computer and make it work faster and more smoothly.
For one, the PowerMyMac can help you uninstall apps from your Mac automatically. Its App Uninstaller will uninstall Dr. Cleaner on Mac with no related files left. So you can also choose other difficult-to-delete software to remove from your Mac, like Avast, PhotoShop, or Adobe apps.
What’s more, PowerMyMac can help you locate and delete junk files that you do not need on your computers like large files and duplicate files that are no longer necessary to use. It can also help you clear your browsing history to make sure that your device is completely protected and safe. And if you want to permanently delete some files, you can also rely on this tool too.
Now, are you willing to learn how to completely uninstall Dr. Cleaner on Mac? If so, then check out the steps we have provided below:
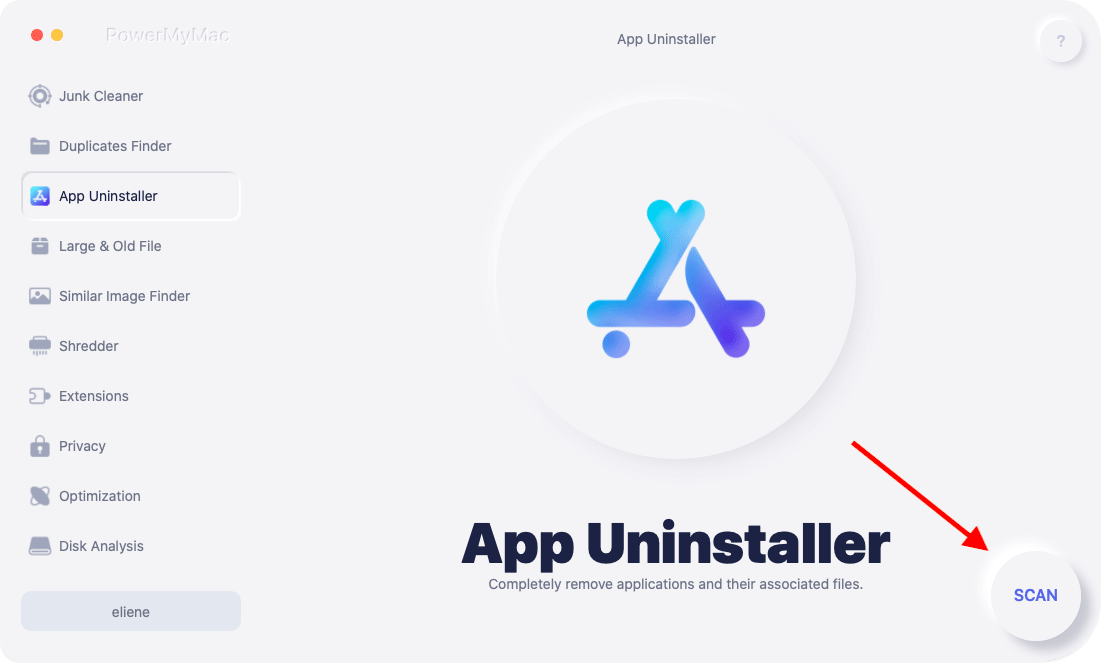
- Launch the iMyMac PowerMyMac after you have successfully installed it on your computer
- Trust the program and choose App Uninstaller
- Select SCAN and it will immediately scan your device for all the applications
- Find the Dr. Cleaner app from the list and tap on it
- Then choose CLEAN to start uninstalling the app from your computer
- Once the deletion process has ended, you can now successfully uninstall Dr. Cleaner on Mac
After that, you can use other features of the PowerMyMac and start cleaning up your device to make it work faster and more smoothly.

Part 3. What is Dr. Cleaner?
Just like the PowerMyMac, Dr. Cleaner is also a cleaning tool that can help you clean up your device and make it work faster. But even though it is an effective cleaning tool because of its outdated time, Dr. Cleaner has been found to contain lots of errors today.
Some users experience the app crashing from time to time. Some even said that it contains viruses and malware that can affect your computer. Other users experience it eating up the storage on your device and causing other minor problems as well. That’s why we really understand those users who think the only way to fix such issues is to uninstall Dr. Cleaner on Mac.
We could not blame them as it is a very effective solution by the way. So if you encounter such problems with your Dr. Cleaner app as well, the best way to fix and get rid of it is to remove it from the Mac.
Part 4. Conclusion
Now that you have finally read all the contents of this article, you now have fully gained all the knowledge that you need to successfully uninstall Dr. Cleaner on Mac.
Again, there are two ways to uninstall it. One is the manual method – which is effective but takes up a lot of time. And the other one is through the use of a professional cleaning tool like the App Uninstaller of PowerMyMac.
This cleaning tool can do lots of things for you and can effectively clean up or optimize your Mac without you doing much effort and wasting your time. So why not download and try it now?

