


On a Mac, it is necessary to do a proper removal of a selected number of programs or applications.
Generally speaking, you should get rid of any applications on a Mac that have either been no longer being used, have been damaged, or are taking up an excessive amount of storage space since doing so can cause the computer to run more slowly.
If you discover either of these issues on the Mac, you will need to search for the software that is causing the issue and immediately delete it. If you want to uninstall Dr. Unarchiver on Mac, it is better for you to read this article which provides you with some methods in order to get rid of specific programs or useless apps.
Contents: Part 1. Can I Uninstall Dr. Unarchiver on Mac?Part 2. Manual Methods to Uninstall Dr. Unarchiver on MacPart 3. Automatically Uninstall Dr. Unarchiver on MacPart 4. Conclusion
Part 1. Can I Uninstall Dr. Unarchiver on Mac?
One of the Mac Unzipper applications known as Dr. Unarchiver is made available by a company known as "Trend Micro, Inc." This one has been brought to attention that it collects and uploads the history of users' browser sessions from Google Chrome, Safari, and Firefox to the servers.
Additionally, data on other programs that have been downloaded on the device will be gathered by the application. When the application is first started up, most of this data is gathered in a compressed archive that is then sent to the developer's databases.
It is strongly recommended that you never provide permission to an application, even if it comes from its App Store, to browse the home directory. Because sometimes other similar programs also have the above problems. So it is better for you to reject to provide permission to them.
To uninstall Dr. Unarchiver on Mac thoroughly as soon as possible is the option that will do the least amount of work for you. Installing this application is as simple as clicking a few buttons. However, uninstalling it completely requires a little more effort on your part.
When attempting to remove The Unarchiver, you can run into any of the following typical problems:
Because it is currently in use, the Dr. Unarchiver can't be relocated towards the Trash folder; a notification indicating an error appears, which puts a stop to the normal uninstallation; it might be difficult to identify and track down any leftovers that are associated with The Unarchiver.
Part 2. Manual Methods to Uninstall Dr. Unarchiver on Mac
It is unfortunate that Apple does not really do quality control checks on the apps that are uploaded to the App Store.
The openness and adaptability of macOS make it possible for you to swiftly remove the app Dr. Unarchiver from Mac, which is a positive development.
Please follow the instructions below to manually remove Dr. Unarchiver from Mac using one of these three approaches.
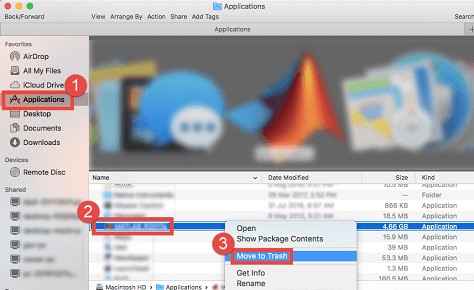
1. Uninstall Dr. Unarchiver on Mac by Moving It to Trash
- Launch Finder, then go to Applications, and then drag the Dr. Unarchiver icon to Trash to begin the uninstallation process.
- Despite the fact that the Dr. Unarchiver program file has been moved to the Trash, all Dr. Unarchiver-related file archiving engines, login items, as well as other 'Hidden' items are still present. You will need to go further if you want to remove these Dr. Unarchiver remnants: Launch Finder > under Menu, select Go > input
~/Library/. - It's possible that you'll find a significant number of folders containing system files here. Now identify Dr. Unarchiver's remaining files by searching through each directory in the file system. It's possible that they are filed away in one of the following directories:
~/Frameworks/,~/Application State/,~/Application Support/,~/WebKit/,~/Preferences/,~/Saved/,~/Caches/,~/Logs/, and~/Containers/. - To complete the uninstallation of Dr. Unarchiver, move the files linked with it towards the Trash, then choose Empty Trashfrom the menu bar. After that, reboot your Mac.
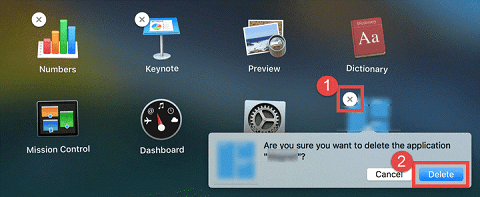
2. Remove Dr. Unarchiver from Launchpad
For the Dr. Unarchiver downloaded from App Store:
- Open Launchpad, then type "Unarchiver" into the search field located at the very top of the page.
- You may make the app icon jiggle by clicking and holding it with the mouse til it does so.
- After clicking the X symbol that shows, choose the Delete option.
- When you select the Deletekey, the removal process will begin.
- After that, you will be able to continue with the process of locating and deleting any program remnants that are concealed inside the
~/Libraryfolders to uninstall Dr. Unarchiver on Mac completely.
3. Delete It Using Its Uninstaller
- In Finder, navigate to the folder "
/Applications." - First, you should attempt to access the folder that contains the program.
- When there is a component with the label Uninstall, double-click it to start it, and then follow the directions that appear on the screen to finish the process of removing the program.
Part 3. Automatically Uninstall Dr. Unarchiver on Mac
If you routinely install and remove different programs on the Mac, a simple, trustworthy uninstall an app is virtually essential. Out of all the comparable items on the market, this is perhaps the best.
With its remarkably user-friendly interface and sophisticated technology, iMyMac PowerMyMac stood out for assisting Mac users in quickly removing troublesome, obstinate, and harmful programs.
Follow the steps below to know how to uninstall Dr. Unarchiver on Mac:
- To begin the removal process, open the PowerMyMac, go to the app's home page and choose App Uninstaller from the menu that appears.
- Click the SCAN button to do a thorough scan of all the programs that are currently installed on your computer.
- If you like, you may choose Dr. Unarchiver or another software. By typing the program's name into the "Search" box, you may locate it.
- Select "CLEAN" if you want to remove all of your files, including those connected to Dr. Unarchiver.
- When it's finished, a message on the screen will read "Cleaned Completed." When it is finished, this will take place.

There are always some applications or programs that you don't want to have on your Mac. In order to make your Mac work smoothly, we recommend that you can install this uninstaller to remove all of those useless apps like uninstalling Google Earth with the simple process.
Part 4. Conclusion
In a nutshell, the purpose of this article is to describe problems that may arise when people on their computers attempt to uninstall Dr. Unarchiver on Mac. Both of the ways described in this article are effective methods for removing other software as well.

