


Quicksilver is a powerful Mac productivity tool that allows users to perform a wide range of tasks quickly and efficiently. However, if you no longer need Quicksilver, or if you're experiencing problems with the app, it's important to know how to uninstall it from your Mac. The process to uninstall Quicksilver on Mac may seem like a simple task, but there are a few steps that you need to follow to remove the app completely from your system.
In this article, we'll take you through the steps you need to follow to uninstall Quicksilver from your Mac and also provide tips on how to ensure that all of its associated files and settings are removed as well.
Contents: Part 1. What Is Quicksilver Software Used for? Part 2. Best Tool to Uninstall Quicksilver from Mac BreezilyPart 3. Classic Option to Delete Quicksilver from MacPart 4. Conclusion
Part 1. What Is Quicksilver Software Used for?
Quicksilver is a popular productivity tool for Mac users that allows them to quickly perform a wide range of tasks on their computers. With Quicksilver, you can launch applications, search for files, perform calculations, control iTunes, and much more, all without having to navigate through menus or use your mouse.
While Quicksilver is a powerful and useful tool, there may come a time when you want to remove it from your Mac. Perhaps you've found a different productivity tool that better suits your needs, or maybe you're experiencing issues with Quicksilver that are impacting your Mac's performance.
One of the most common problems that users face when trying to uninstall Quicksilver on Mac is that the app leaves behind various files and folders that can clutter up your system and take up valuable space on your hard drive. This is because Quicksilver doesn't come with an uninstaller, so users need to manually remove all of its associated files and settings.

Another issue that users may encounter when trying to uninstall Quicksilver is that the app may not appear in the Applications folder or the Launchpad. This can make it difficult for users to locate the app and remove it from their system.
In some cases, users may also experience issues with Quicksilver's performance, such as slow launch times or freezing. If you're experiencing these types of problems, it may be time to uninstall Quicksilver on Mac and look for an alternative productivity tool that better suits your needs.
Whatever the reason, it's important to know how to uninstall Quicksilver properly to ensure that all of its associated files and settings are removed from your system. In the next section, we'll take you through the steps you need to follow to uninstall Quicksilver properly from your Mac.
Part 2. Best Tool to Uninstall Quicksilver from Mac Breezily
If you want to uninstall Quicksilver and its associated files quickly and easily, then iMyMac PowerMyMac is the perfect tool for the job. This powerful software comes with an App Uninstaller feature that can help you remove all traces of Quicksilver from your Mac in just a few clicks. Here's how to use PowerMyMac to uninstall Quicksilver:
- Download and install PowerMyMac from the official website.
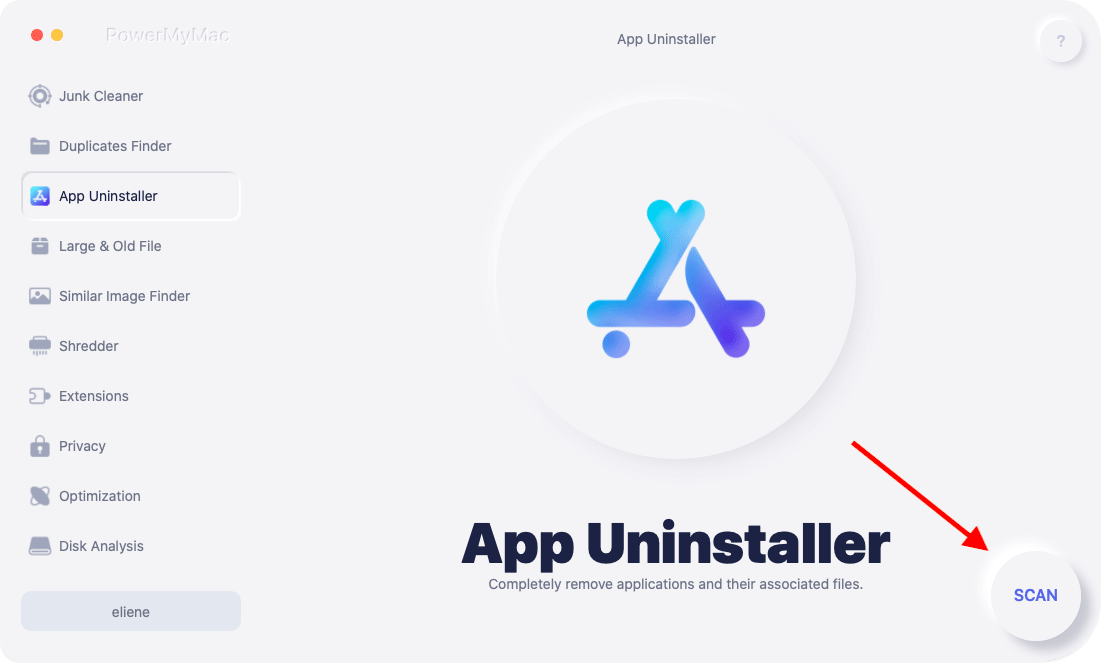
- Launch the software and select "App Uninstaller" from the left-hand menu.
- Click SCAN. Wait for the tool to scan your system for installed applications.
- Locate Quicksilver in the list of installed applications and select it.
- Click on "CLEAN" to begin the uninstallation process.
- PowerMyMac will then remove all associated files and folders from your system. Wait for the process to be done.
With these simple steps, you can quickly and easily uninstall Quicksilver on Mac without having to manually search for and remove all of its associated files and settings. PowerMyMac's App Uninstaller feature makes it a breeze to keep your system clean and free from unwanted files and applications. Besides Quicksilver, if you have LaunchBar on your Mac, but no longer need it and want to completely remove LaunchBar, you can try this feature.
In addition to its App Uninstaller feature, PowerMyMac offers a wide range of other tools and features that can help you optimize your Mac's performance, including a Junk Cleaner, Duplicate Finder, and more. With PowerMyMac, you can keep your Mac running smoothly and efficiently.
Part 3. Classic Option to Delete Quicksilver from Mac
If you prefer to use a more classic approach to remove Quicksilver from your Mac, you can follow the steps outlined below:
Option 1. Remove Quicksilver via the Applications Folder
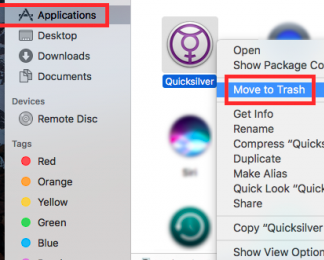
- Open the Finder and go to the Applications folder.
- Locate the Quicksilver app icon and drag it to the Trash bin or right-click and select "Move to Trash".
- Right-click on the Trash bin icon in the Dock and select "Empty Trash" to permanently uninstall Quicksilver on Mac.
- Search for any Quicksilver-related files on your Mac and remove them manually, such as preferences, caches, and supporting files in the Library folder.
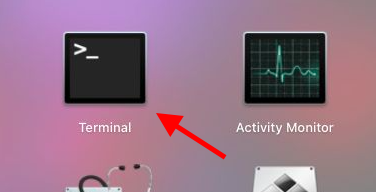
Option 2. Use Terminal to Uninstall Quicksilver
- Open the Terminal app on your Mac.
- Type in "
cd /Applications/" and press Enter to navigate to the Applications folder. - Type in "
sudo rm -rf Quicksilver.app/" and press Enter to delete the Quicksilver app from your system. - Type in your administrator password when prompted and press Enter to confirm the deletion.
- Search for any Quicksilver-related files on your Mac and remove them manually, such as preferences, caches, and supporting files in the Library folder.
While these steps may seem straightforward, it's important to note that choose manually uninstall Quicksilver on Mac and its associated files can be time-consuming and may not remove all of the files associated with the app. In addition, if you're not familiar with Terminal commands, it can be easy to make mistakes that could potentially harm your system.
Overall, while these classic options are available for removing Quicksilver from your Mac, using a dedicated uninstaller tool such as PowerMyMac's App Uninstaller can save you time and effort, while ensuring that all files and settings related to Quicksilver are completely removed from your system.
Part 4. Conclusion
In conclusion, removing Quicksilver from your Mac can help you free up space, optimize your system performance, and keep your Mac running smoothly. While there are a few classic options available for uninstalling Quicksilver, such as manually removing files or using Terminal commands, these methods can be time-consuming and may not remove all of the files associated with the app.
On the other hand, using a dedicated uninstaller tool such as PowerMyMac's App Uninstaller can make the process quick and easy, ensuring that all files and settings related to Quicksilver are completely removed from your system. Additionally, PowerMyMac offers other features such as Junk Cleaner, Duplicate Finder, and more to help you optimize your Mac's performance.
Regardless of the method you choose, it's important to uninstall Quicksilver on Mac properly to avoid any potential issues or conflicts that could arise from leaving any remnants of the app on your system. With the help of the right tool, removing Quicksilver from your Mac can be a hassle-free process, allowing you to maintain a clean and efficient system.

