


Transferring photos from Mac to iPhone allows you to back up before wiping them out. There are many ways to sync iPhone photos with your Mac depending on your requirements and capabilities. You can use the Mac app, iCloud Photo Library, iTunes or a proprietary tool to sync pictures between your computer and iPhone.
Besides, moving Mac photos to iPhone carves tons of gigabytes in your cellular device. It also makes it a breeze to edit or retouch because of the larger screen with a higher resolution. Native Mac tools help enables you to convert, arrange, and resize in a trice.
In this piece, we’ll dissect simple, quick techniques to transfer images over.
Article GuidePart 1. Factory Preinstalled Ways to Move Photos from Mac to iPhonePart 2. Transfer Photos from Mac to iPhone with Image CapturePart 3. Other Ways to Transfer Your PicturesPart 4. The Bottom Line
Part 1. Factory Preinstalled Ways to Move Photos from Mac to iPhone
As part of the Apple ecosystem, the iPhone and Mac have many ways to synchronize and translocate content.
Import Photos from Mac to iPhone with Photos App
The most straightforward way is to connect the Lightning-to-USB cable you use to charge the mobile phone into one of Mac’s USB ports. When an iPhone is paired, the macOS Photos app opens directly and hints importing your images. Here’s the flight path, bit by bit.
- Plugin your iPhone to the Mac with a Lightning-to-USB cable.
- Unlock your iPhone and authorize it to trust the device.
- The Photos app loads and throws up your images from mobile in the main window. Otherwise, choose your cellular device from the left-hand in the Photos app. At this juncture, you’ll access images located in your iPhone’s Camera Roll.
- Click on “Import All New Items” in the upper right-hand side, or scroll through the files, choose the ones you want to transfer, and hit Import Selected.
Once you import, you can command Photos to automatically delete the images on your device, freeing up all space and let you capture even more photos.
Import Photos with iCloud
iCloud offers an in-built way to translocate photos from Mac to iPhone. iCloud Photo Library can do the job.
To launch iCloud Photo Library on your iOS, follow these steps:
- Head for Settings.
- Tap on the name in the upper area.
- Navigate to iCloud.
- Below the iCloud storage readings, you’ll see a collection of Apps Using iCloud.
- Select Photos.
- Toggle on iCloud Photo Library on (iCloud Photos in iOS 12).
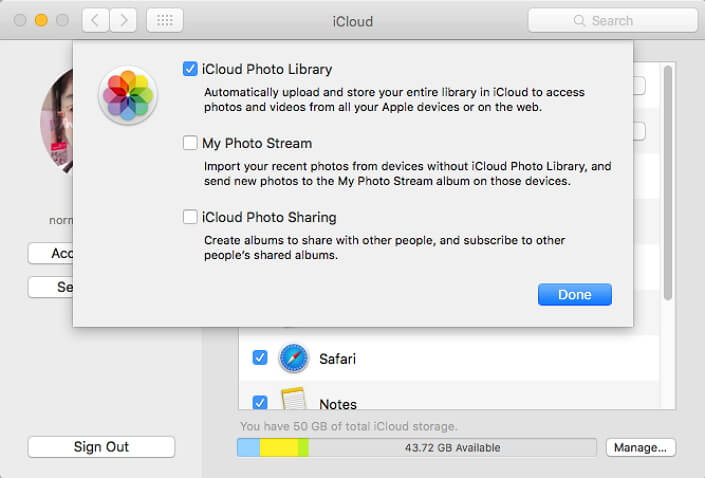
Next, prepare your Mac:
- Open the Photos app.
- Head to the Photos list of options in the menu bar.
- Hit Preferences.
- Next, hit iCloud.
- Tick the box neighboring iCloud Photo Library (iCloud Photos in macOS Mojave).
Note: You must use the same Apple ID for your images to sync automatically between the devices.
Part 2. Transfer Photos from Mac to iPhone with Image Capture
The Image Capture app served as a tool for importing images from scanners or other devices when iPhones were all the rage. However, the Photos app on Mac almost made it obsolete. But not so for highly experienced photographers, they still wield it to hive off photos from the main Photos library.
Image Capture allows you to relocate screenshots or photos you don’t want to keep on your Mac. It kicks in when you want to transfer an image to your Mac without retaining or displaying it as an album. Follow the steps below to get the job done with this genius tool:
- Plugin your iPhone to Mac and fire up Image Capture.
- Choose your iPhone in the device list if unselected> Set the recipient folder for your imagery.
- Click Import/import all to extract photos from Mac to iPhone.
Image Capture includes a feature to wipe away photos. In addition, Image Capture will transfer your photos into the Pictures folder on your iPhone and gives you the latitude to specify other destinations. It comes in handy if you like to cream off separate photographic projects reserved in their individual folders.
Part 3. Other Ways to Transfer Your Pictures
Email/Messages
If you just want to import a single photo, you can use email or Messages to send it from your Mac and copy the attachment on your phone. Head to Photos on the iPhone and pick out the photo you want. Hit the share icon then tap on the icon for email or Message. This will send the photo into Message or email. You can even attach it on Skype or other platform and download on iPhone.
AirDrop
Toggle on AirDrop on iPhone to transfer your picture. Run Control Panel by swiping to check if it’s turned off by default. Double-press on the block of icons with Bluetooth, Mobile data and WiFi symbols to access AirDrop-tap that to select Contacts Only or Everyone. Keep Bluetooth enabled and hunt down the picture you wish to share, hit the Share icon and on the adjacent screen, an option Tap to share with AirDrop and a symbol for Mac pops up here.
To translocate a photo from your computer to your iOS, click on the picture that symbolizes your Mac over your iOS to kick-start the sharing process. The image will appear in your desired destination.

Golden Tip: Wipe Away the Similar Images on Your Mac
Similar Image Finder of iMyMac PowerMyMac integrates breakthrough file-finding technology. It’s patterned on reverse-image searching art akin to search engines for better accuracy. It sifts through your system to skim off the duplicated images on your Mac.
You can scan by photo and wipe away the similar images to free up gigabytes of space. It dives beneath folders and unearths similar images. It makes it super easy and fast to hunt down replicas for editing, creating more space, or other idiosyncratic reasons.
Part 4. The Bottom Line
Now that you can never go off the boil on how to transfer photos from Mac to iPhone, give it a shot with the methods above. You don’t need third-party tools if you’re not into sophisticated editing or mass files thanks to Apple’s preinstalled solutions. Most of these ways will only support importing Camera Roll imagery.
If you want to harvest photos archived in other albums, you’ve to change tack to other solutions. Some like FoneDog Phone Transfer allows you to create a full-blown backup.

