


You know it’s there. The question is, do you know what’s it’s for? FileVault is a good way to protect your data. With the FileVault disk encryption, you would have to type in your password again to wake your Mac from sleeping. That way, no one else can access your files. Your Mac contains critical and confidential data.
Do I need FileVault on my Mac? There are times when you have to leave your Mac unattended. When you do, someone could just use it and collect data from it. That’s something you don’t want to happen, right?
Hence, it is the reason why Apple created FileVault disk encryption to protect your Mac in case you need to leave it unattended. It’s time to get to know more about this particular feature of Mac. It’s there for a reason so get to know how to turn it on and turn it off.
Contents: Part 1. What Is FileVault Disk Encryption on Mac?Part 2. How to Manage FileVault on Mac?Part 3. Bonus: Protect Your Privacy with PowerMyMacPart 4. Conclusion
Part 1. What Is FileVault Disk Encryption on Mac?
What is the use of FileVault in Mac? FileVault is a feature in macOS that is full disk encryption for the startup disk. It encodes the information stored on your Mac. Without it, your files on your drive are left unencrypted. That means anybody with access to the drive can read them. So what? You’re the only one who has access to the drive, right?
Yes, that’s correct. For the most part, your files are safe but what if someone steals your Mac? Even if you have a password set it still doesn't mean the files there are encrypted. That just prevents the person, who stole your Mac, from getting past the startup mode. Now, what if they figure out your password? They will have access to everything.
Here’s the thing. It’s doable to pull the drive out of your Mac. Once someone has possession of the drive, it could easily be plugged into another computer. Once it’s plugged into a computer, the files could easily be accessed.
Now, what is the pros and cons of FileVault disk encryption? Well, the pros are It encrypts your files so that no one can read them. And it will not slow down your Mac at all. The cons are that you should keep your recovery key safe somewhere.
If you think about it, so what? Well, if you don’t give too much importance to your files, you probably wouldn’t care if your files are exposed. If you care enough for your files, then FileVault should come in handy. With FileVault, all the files are encrypted so the data can't be accessed. It requires a password to access the encrypted data.
Should I Use FileVault Disk Encryption on My Mac?
Should I turn on FileVault disk encryption? It’s a good question. For some, it may be a debatable question. FileVault comes in handy if your Mac gets stolen. It prevents your data from being accessed. This feature is definitely useful in a MacBook. Since a MacBook is portable, there’s a huge chance for it to get stolen. A desktop Mac has fewer chances.
So, if you’re thinking about using it, consider your hardware. Does FileVault slow down Mac? In some cases, it might not be a smart thing to enable FileVault. For starters, it takes up a lot of space. It will cause your computer to have less available space. Encrypting data takes up space.
Another thing to consider about FileVault is that it is password activated. Once you forget your password, you won’t be able to access your files. So, the answer to the question, should you use it, is up to you.
Part 2. How to Manage FileVault on Mac?
With all that has been said about the FileVault disk encryption, one thing is for sure. It’s there to protect your Mac. Knowing how to manage this particular Mac feature wouldn’t hurt. Below are the various methods on how you can manage FileVault.
#1. Check If FileVault is Enabled
FileVault is a default feature on your Mac. Still, it wouldn’t hurt to know if it’s enabled. Follow the steps below to see if FileVault is enabled on your Mac.
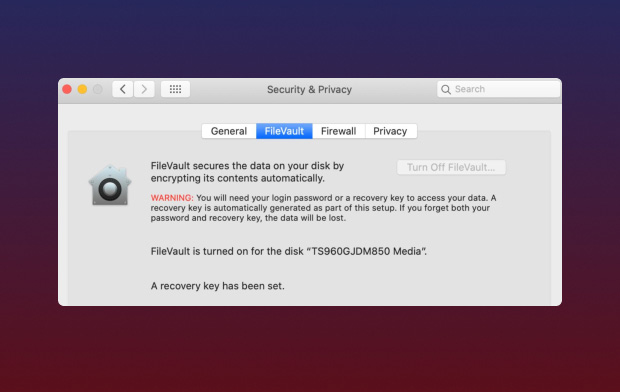
Step 1. Access to FileVault
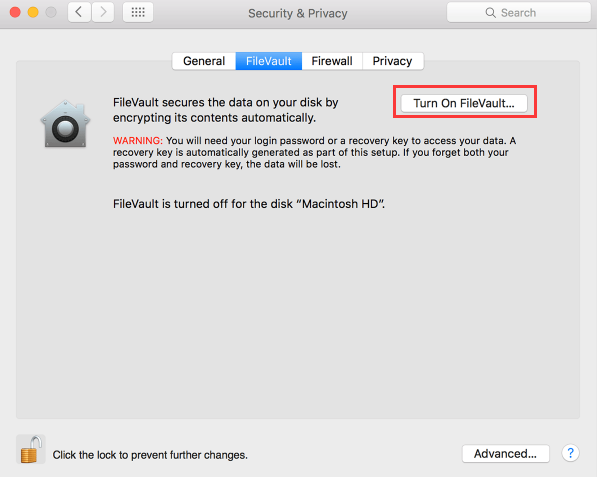
Take your cursor to the top menu and click the Apple icon. Select System Preferences from the drop-down list and then click on Security & Privacy. You will see the FileVault tab. Click on it.
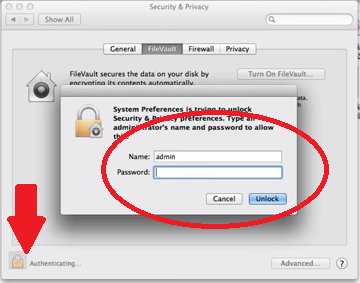
Step 2. Enter Administrator Password
Click on the lock icon you see on the left, bottom part of the screen. A pop-up window will appear, prompting you to enter your name and password.
Step 3. See If FileVault is Enabled
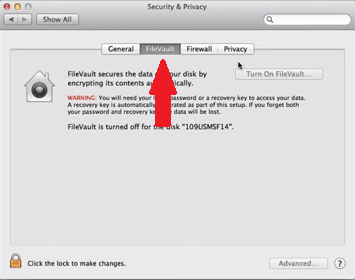
You will be on the Security & Privacy page. Here, you will see a tab that says Turn off FileVault. If the tab says Turn off FileVault is greyed out, then it’s obviously, enabled.
#2. Enable FileVault
If in case, your FileVault is turned off, the steps below will show you how to turn on FileVault disk encryption.
- To enable FileVault, go to the Apple icon on the top menu to click on System Preferences. Once you’re inside that folder, click on Security & Privacy. You would then have to click on the lock icon to type in the administrator password for the device.
- Then, take your cursor to the tab that says Turn On FileVault. Click on that tab.
- A drop-down window will appear where you would have to choose the users who can unlock the disk.
- Choose a user and click on the tab that says Enable User. You will see this tab Beside each of the user’s name. Then click on the Continue tab you see on the bottom part of the screen.
- The recovery key is a safety net that can be used to unlock the device if you ever forget your password. This is a very critical step to ensure that you will be able to recover your encrypted files. Copy and paste the recovery key in a protected document and store it in a place only you have access to. Save it to a safe and secure space. Click on the Continue tab.
- Another drop-down window will appear. There you will have an option to allow Apple to store your recovery key. If you allow Apple to keep a copy of your recovery key, you would have to choose some security questions.
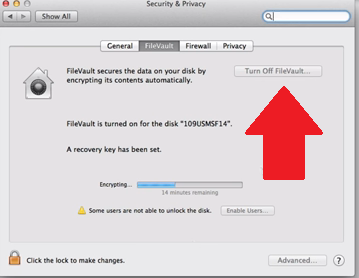
- You would have to click on the Restart button you see on the right, bottom part of the screen. It’s going to take a few minutes for the feature to start working. Once you log back into your Mac, the first you will see is the Security & Privacy window. It will show you that it's encrypting the drive.
#3. Disable FileVault
What happens if I disable FileVault on Mac? If you don’t want the FileVault disk encryption enabled on your Mac, you can disable it as well. Just follow the steps below to turn off FileVault encryption on Mac.
- Tap on the Apple icon on the menu on top and select System Preferences. A drop-down list will appear and from there, click on Security & Privacy. Inside the Security & Privacy window, you will immediately see the FileVault tab. Click on it.
- Again, you would have to enter the administrator password at this point. To do that, tap on the lock icon for the pop-up window to appear. Type in your name and password in the pop-up window to enter the Security & Privacy window.
- Once you’re on the Security & Privacy page look for the tab that says Turn off FileVault. Just tap on it to turn it off.
Part 3. Bonus: Protect Your Privacy with PowerMyMac
There is no doubt that there are advantages to use the FileVault disk encryption feature of Mac. Should you choose to use it, keep in mind that it will take up a lot of space. Don’t worry about that because you can always use the iMyMac PowerMyMac.
This is a program that cleans and protects your Mac from any imminent danger. It gets rid of those files that you don’t need anymore so that there is always enough space. For that reason, it works well with FileVault.
It’s also worth noting that it works well even if you don’t opt to use FileVault. It also protects your privacy by giving you the option to erase files that could harm your privacy on Mac. With PowerMyMac, it’s so easy for you to find those files that could endanger your privacy. So, it’s not just a program that you should consider if you opt to enable FileVault. It’s a program that you should consider even if you opt to do with FileVault.
Part 4. Conclusion
There are a lot of things to consider should you decide to enable FileVault. You can also turn off FileVault disk encryption as you need. Nonetheless, there are programs like the PowerMyMac to ensure that FileVault works well on your Mac.
Have you ever tried using FileVault? Feel free to share some of your thoughts on this particular mac feature. Our readers would love to hear from you.

