


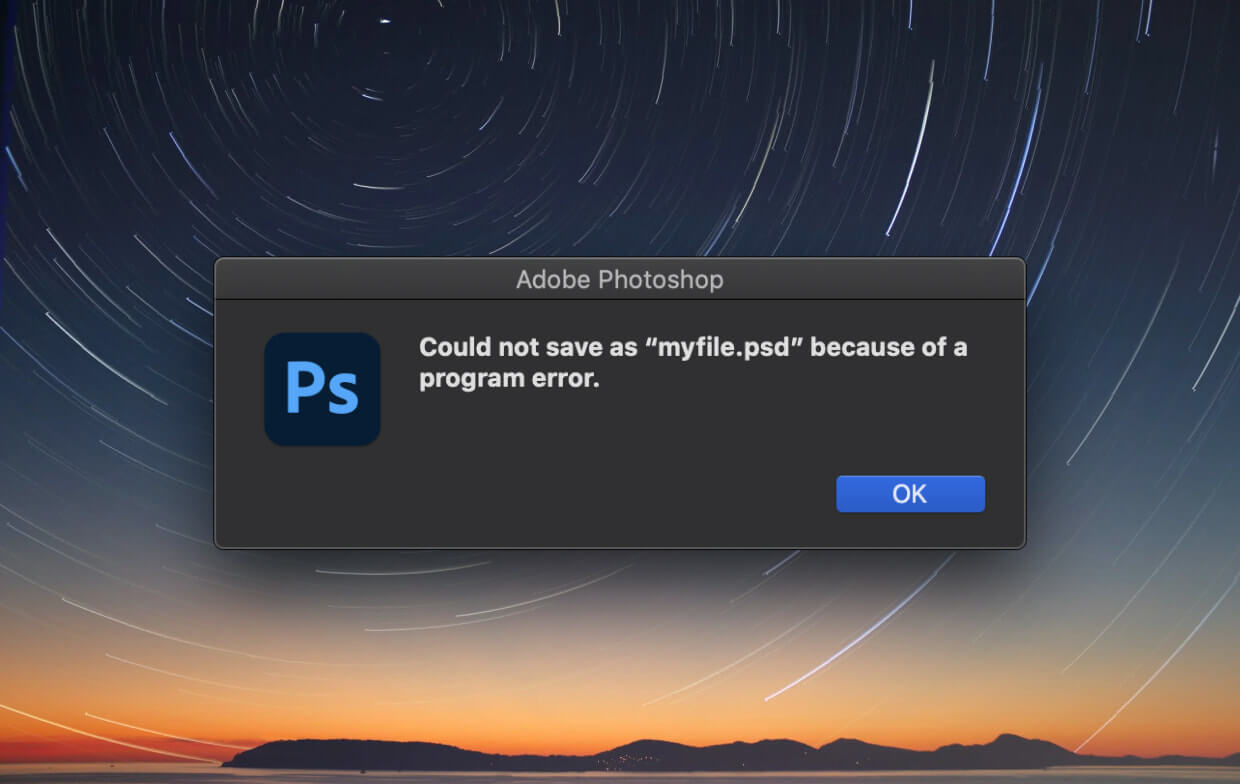
Mac is one of the devices that we can count on in using programs like Adobe Premiere Pro, Final Cut Pro, and Adobe Photoshop. Now, if you are in this kind of field, then you must probably encounter some errors that are actually related to your scratch disk. One of the most common error that you will receive is when Photoshop is unable to open together with a message that says “could not initialize Photoshop because the scratch disk is full”.
However, lucky for you that even if you are encountering this "photoshop scratch disks are full" error you still can get it fixed simply by learning ways to clear scratch disk PhotoShop Mac. We are also going to show you how to clear scratch disk and how you can clean up your Mac to free up space as well as have it performed at its best.
Contents: Part 1. Can't Open Photoshop Because Scratch Disks Are Full?Part 2. What Do You Do When Scratch Disks Are Full?Part 3. How Do I Empty The Scratch Disk in Photoshop?Part 4. How Do I Empty My Scratch Disk without Opening Photoshop on Mac?Part 5. In Conclusion
People Also Read:Startup Disk Full on Mac, Full Solution in Here!How to Use Mac Disk Utility to Repair Disk?
Part 1. Can't Open Photoshop Because Scratch Disks Are Full?
Where is my scratch disk on Mac? Before we proceed with the process on how to clear scratch disk in PhotoShop on Mac, it is a must that you first need to know about the scratch disk. Once that you started using programs such as Final Cut Pro or Photoshop, they will automatically ask you to have some sort of space called the virtual memory or sometimes called the cache memory. This is because it the place where all the project files that you are going to make will be saved and accessed.
Your scratch disk actually serves as your hard drive space which is used by the programs such as Photoshop. It serves as the virtual memory when you no longer have enough RAM for you to be able to finish your task. When you are using Photoshop, it actually allows you to use several scratch disks on your Mac. If you are working on with some large images and layers, the Photoshop program will then start to get your Mac’s space and is piling up your project temporary files.
So, once that you started using Photoshop, always keep in mind that you have an option for you to use your scratch disk on your chosen hard drive. “scratch disk are full” will happen on Mac or in Windows 10, the 2 most common used systems. Then you need to clear scratch disk photoshop when it is full. We mostly recommend for you to do is for you not to use your Mac’s system drive not unless you no longer have another alternative.

Part 2. What Do You Do When Scratch Disks Are Full?
When you are using your Mac, there is a tendency that you will be receiving a message that says “scratch disk full”. This means that you have used up all the space on your hard drive that you have used to assign and be used as your scratch disk.
Photoshop does not always have the ability to remove the temporary files that you no longer need. This is where the problem occurs. So if this is the case, what you need to do is for you to delete temp files in photoshop on Mac.
Part 3. How Do I Empty The Scratch Disk in Photoshop?
You need to delete the photoshop scratch disk Mac. This is a solution that you can do once that you received a message that says “scratch disk is full”. If you happen to get this kind of message on your Mac, then that means that the hard drive that you have assigned as your scratch disk is out of space. Then maybe you should do something like removing mac purgeable space.
The one problem that you will encounter in using Photoshop is that it does not always remove all the files that are temporary once that you no longer need them. Now, this can be a big problem if you do not know what to do or the solutions that you need to know. That is why we have included here some ways on how to clear scratch disks in Photoshop (Mac).
Here is a quick guide on how to clear scratch disk in Photoshop on Mac, just have a look at these easy steps as following:
- Clear scratch disk in Photoshop.
- Delete Photoshop temp files on Mac.
- Make sure that you empty your disk space.
- Replace your scratch disk.
Step 1. Clear Scratch Disk in Photoshop on Mac
In general, the photoshop program already comes with a built-in solution which it can detect its cache. Once that these caches were not removed by photoshop automatically by the program, these will be piled up and can take up a lot of memory from your scratch disk space.
For you to be able to use this tool, all you have to do is to enter Photoshop on your Mac and launch it together with an image and do the following steps.
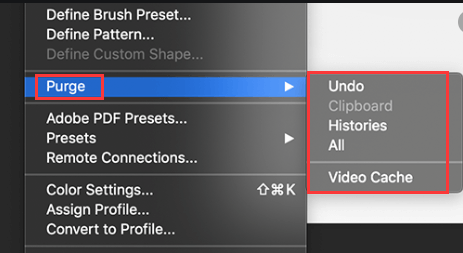
- Click on the edit menu button.
- Then, point your mouse cursor over “purge” for you to see four different options.
- Then try to click Undo, Clipboard, History, All. If you see an item that is in grey then that only means the item is already deleted.
- After that, you can also choose a specific item that you would want to remove. You can also click on “Select All” if you would want to delete your cache all at the same time.
- A prompter will give you then a warning that the action will not be undone. Now, this is where you have to make sure that you no longer need any item on your project. Then click on the “OK” button.
By following the steps above, you will know how to clear scratch disk in Photoshop CS6, CS3...
Step 2. Delete Photoshop Temp Files on Mac
In terms of having your scratch disk space full, the thing that is responsible for this is your Photoshop temp files. As we have mentioned earlier, there are instances that this program removes these files automatically. However, if it does not, then you have to do it manually. Or you can also make use of the Mac cleaner tool to remove these temp files easily.
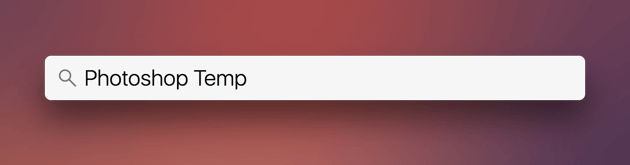
For you to start looking for these temp files, you will be needing to find those files that start with “pst” and a string of numbers together with the extension name “.tmp”. You can also try to look for your scratch drive.
However, you have to make sure that you will be able to find everything. You can also try to look within your entire Mac. This process may take up some time so you have to be patient enough until the process is complete.
Step 3. Make Sure That You Empty Your Disk Space
If in case you do not have any spare hard drive or you do not want to get a new one, then the best option for you to do a quick clean up on your Mac. You can start by looking at the content of your hard drive and look for any files that you no longer need and delete it.
One alternative that you can also do is for you to transfer your DVD’s, external hard drive, or your storage cloud to your iCloud or your Dropbox.
NOTE FOR ALL macOS SIERRA USERS OR HIGHER VERSION:
For all those macOS Sierra users, some are already aware that Apple has a new tool that can help you in managing your storage space on your Mac. All you have to do is to do the following steps.
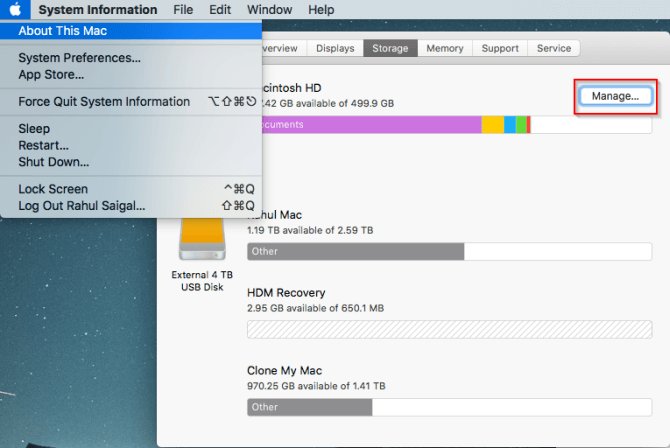
- Go to the Apple Menu.
- Then click on “About This Mac”.
- Then choose “Storage” and you will be able to see the new bar graph for Sierra.
- Once that you select “manage” then you will be prompted to the new tools that the Sierra has.
This version had released several helpful elements that could help you such as using the “Optimized Storage”. However, since these kinds of things on your Mac are made automatically, then people who use Sierra do not know what their Mac is doing for them.
So, if this is the case, what we usually recommend you to do is for you to turn off all these tools on your Mac. Otherwise, if you want to turn them on automatically, then make sure that you have the knowledge of what it can do to your Mac.
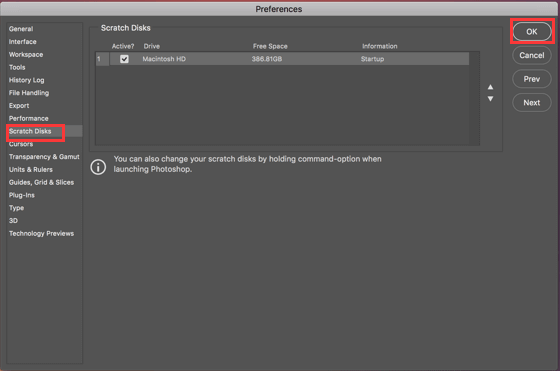
Step 4. Replace Your Scratch Disk
As we have mentioned earlier, you can definitely identify what is taking up your Mac’s storage space. Now the thing that you can do is for you to change your scratch disk into another hard drive that you have on your Mac system. If in case you no longer have any hard drive on your Mac, they might as well buy one. Choose SSD as this will be the best option as a scratch disk on your Mac.
Here are the steps about how you can change the scratch disk on your Photoshop.
- The first is to click on Photoshop.
- Then go to “Preference” and then choose “Scratch Disk”.
- After that, mark down the checkbox for you to remove or to select a hard drive and serve as your scratch disk.
- Then click on the “OK” button.
- After the process is complete, restart Photoshop.
Defragment the Hard Drive
There are instances in which the “scratch disk is full” message pops up even if the current scratch disk drive has adequate free space. The reason for this is that Photoshop requires continuous, unfragmented free space on the scratch disk drive.
Once this error message occurs despite having a scratch disk drive with enough free space, it is recommended to use a disk defragmentation tool.
Part 4. How Do I Empty My Scratch Disk without Opening Photoshop on Mac?
For you to have a better experience in using your Mac’s Photoshop, all you need is the iMyMac PowerMyMac, it can clear scratch disk with just a few clicks.
PowerMyMac has the ability to clean up your junk files, caches, browser cookies and history. It can also remove any apps to improve your experience on your Mac.
Here is how to use the PowerMyMac to clear scratch disk in PhotoShop on Mac:
- Download the PowerMyMac on your Mac from www.imymac.com. And then, have the program installed and launched on your Mac.
- Click on the “Junk Cleaner” and scan junk files on your Mac.
- When the scanning is completed, you can select the Photoshop cache under Application Cache to clean.
- Click on the “CLEAN” button then PowerMyMac will start cleaning your junk files. Wait for the program to complete the process and you'll clear Photoshop cache and other data.
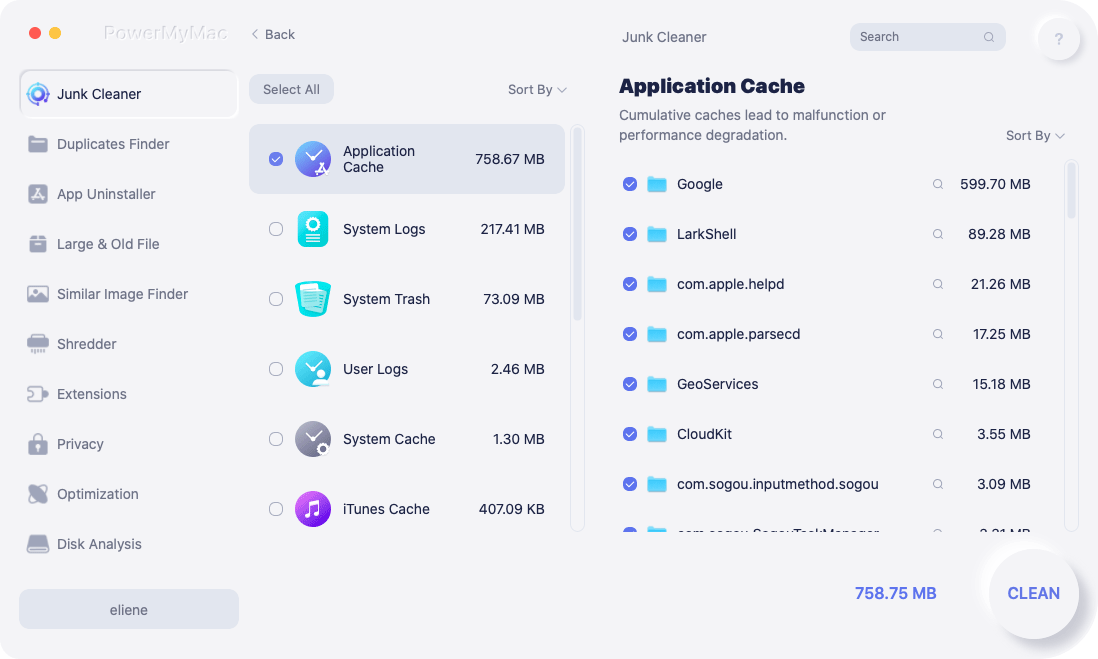
There you have it! Your scratch disk is all cleaned up.
Part 5. In Conclusion
Now that you know what scratch disk is, you now have the idea on how and where it is used. Make sure that this scratch disk has more than enough space so that you can save more files using Photoshop. An in case that you run out of space, simply clear scratch disk in Photoshop on Mac, or you can assign another hard drive that will serve as your scratch disk.
You can also clean scratch disk on Mac with the best free Mac cleaner. PowerMyMac is also one of the most effective tools that you can use to clean up all the junks like history, caches, cookies, and more that you no longer need on your Mac. This way, your task will be done faster.


mariya jonsan2020-05-05 08:37:38
To escape the error, you shall keep your Mac unloaded with temporary files, caches, and junk. This action allows Mac to flawlessly execute the Photoshop task and get the appropriate amount of memory backup for the same. shorturl.at/qPWZ5