What is Testpid? How do you remove Testpid?
Adware called Testpid installs itself on the device as an extension. After it has been downloaded on a computer, Testpid will begin to cover the settings for the advertising that the user wants to display. Even they secretly enter the PC via other trustworthy apps.
Although they state that they will download "Testpid" on the machine, nobody carefully reads this notice. In reality, all of us are pressed for time to hit NEXT, NEXT, NEXT to download the application on the computer. The user lacks the time to carefully study the terms & conditions of the installation.
Nevertheless, Testpid has made its way onto the computer. Therefore we are providing you with the correct procedure to get rid of harmful apps such as deleting Testpid entirely with step-by-step instructions.
Contents: Part 1. What is Testpid?Part 2. Efficient Ways to Remove Testpid Ads from BrowsersPart 3. Quickly & Safely Remove Ads by Testpid from MacPart 4. Conclusion
Part 1. What is Testpid?
At its core, Testpid is an ad network. Every time a user clicks from one of the firm's advertisements, the advertisers pay the company. In order to enhance the number of adverts a user sees and the likelihood that they would click popups, they deploy malware and browser plugins.
The following statements are often seen on ads from Testpid: "Powered by Testpid," "Advertisements by Testpid," "Brought to you by Testpid," "Ads by Testpid," or "Ads powered by Testpid."
Why do we need to remove Testpid? Since malware or browser plugins were loaded on the computer, you've undoubtedly seen a rise in Testpid advertising. Deceptive advertising and software packaging are the two possible avenues for this to occur.
The most typical method for installing Testpid is via false advertisements. Users are asked to download it before they can access games that are played in a browser or using Flash. But in fact, all that is really activated on the computer is the browser plugin.
The alternative method involves software bundling. This happens when you download a free program for the Mac, and other software—usually malicious software—is downloaded at the same time.
In the long run, Testpid adverts are mostly annoying for so many people. However, like other adware, Testpid adverts may accumulate and render your browser useless. Not to add that it may make the Mac more susceptible to malware that is more dangerous, which is why you must remove Testpid.
Part 2. Efficient Ways to Remove Testpid Ads from Browsers
Your computer has a browser plugin downloaded, and this is the reason you see advertisements for Testpid on your screen. And despite the fact that you usually only have been using a single browser for most of your browsing needs, you still should inspect the other browsers that you have downloaded to ensure that the Testpid plugin is not lurking anywhere on the hard drive.
To remove Testpid on different browsers, refer to the instructions below:
1. Remove Testpid Ads from Safari
Get rid of undesirable add-ons in Safari:
- Go to
Safari > Preferences... - In the newly opened window, choose Extensions.
- Choose the extension that you do not want, and then click the Uninstall option.
Safari's caches, as well as other data, may be deleted by following these steps:
- Open Safari and choose "Clear History."
- Select all history from the list that appears in the drop-down list located beneath Clear.
- Click Clear History to confirm.
If the actions that were listed above did not assist you, try resetting Safari:
- Simply go to
Safari > Preferences... - Click the tab labeled "Advanced."
- Check the box next to Show Develop in the menu bar.
- Select Develop in the menu bar, then choose Empty Caches.
2. Remove Testpid Ads from Chrome
Remove Testpid by deleting dubious plugins on Chrome:
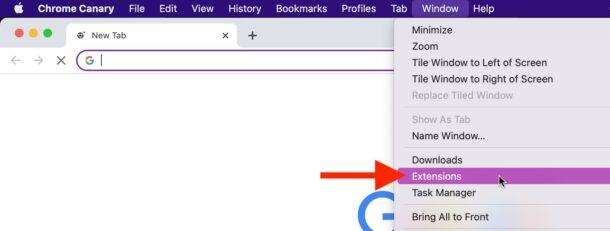
- Launch Google Chrome, and choose
More tools > Extensionsfrom the menu in the top-right corner. - You may view every extension that has been installed in the recently opened box. By selecting Remove, remove all of the dubious plugins that could be connected to the harmful software.
Clear Chrome's web data and cache:
- Select Settings by clicking Menu.
- Choose Clear browsing data within Privacy and security.
- Choose Cached pictures and files, Cookies, as well as other site data from your browsing history.
- Select Clear data.
Alter your homepage:
- Select the menu, then select Settings.
- In the On startup area, search for a questionable website.
- To access the Remove button, choose Open a specific page or collection of pages, and then select the three dots.
Restart Google Chrome to remove Testpid if the preceding ways did not work for you:
- Select Settings from the Menu.
- Scroll down and hit Advanced under the Settings.
- Find the Reset, then clean up area by scrolling down.
- Select Restore settings into their defaults now.
- Reset settings to confirm.
3. Remove Testpid Ads from Firefox
Remove Testpid by deleting threatening extensions:
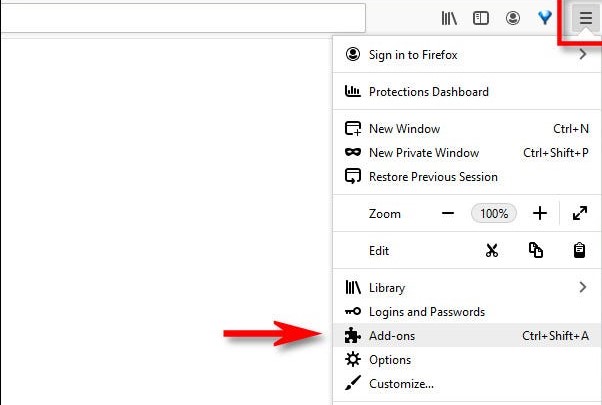
- Select the Menu in the Mozilla Firefox browser.
- Choose Add-ons.
- Here, choose the plugin you don't want and select Remove.
To reboot the homepage:
- To access the menu, select the three lines on the upper right side.
- Select Options.
- Below "Home options," type in the URL of the site you want to access every time you start Mozilla Firefox.
Remove Testpid by deleting cookies and site information:
- Select Options from the Menu.
- Go to the section on Privacy and Security.
- Scroll down to find Cookies and Site Data.
- If you select Clear Data...
- Choose Cookies and Site Data and Cache Web Content, then press the Clear option.
Restart Mozilla Firefox:
- Select the Menu in the Mozilla Firefox browser's main window.
- Select Troubleshooting Information from the Help menu.
- Select on Refresh Firefox underneath Give Firefox a tune-up.
- When the pop-up box comes up, click Refresh Firefox to verify the action.
4. Remove Testpid from Edge
Remove MS Edge plugin in order to remove Testpid:
- Choose Extensions from the Menu.
- From its list, select the Gear icon.
- Select Uninstall located at the bottom.
Remove browser cookies and data:
- Select the Menu and choose Privacy & security.
- Choose what to clear underneath "Clear browsing data."
- Choose everything (excluding passwords) and hit Clear.
If the previous procedures failed, restart MS Edge:
- Launch Task Manager with
Ctrl+Shift+Esc. - Select the More details.
- Choose Details.
- Find each Microsoft Edge item and scroll to the bottom. Right-click, then click End Task to close MS Edge.
Part 3. Quickly & Safely Remove Ads by Testpid from Mac
The worst thing about malware or malicious files would be that it typically gets on the device without you knowing till it's too late. You could help with it by downloading the software iMyMac PowerMyMac.
It was originally designed to assist speed up the computer and improve its performance.
To remove Testpid ads from Mac using the PowerMyMac, follow these steps with the "Extension" feature:
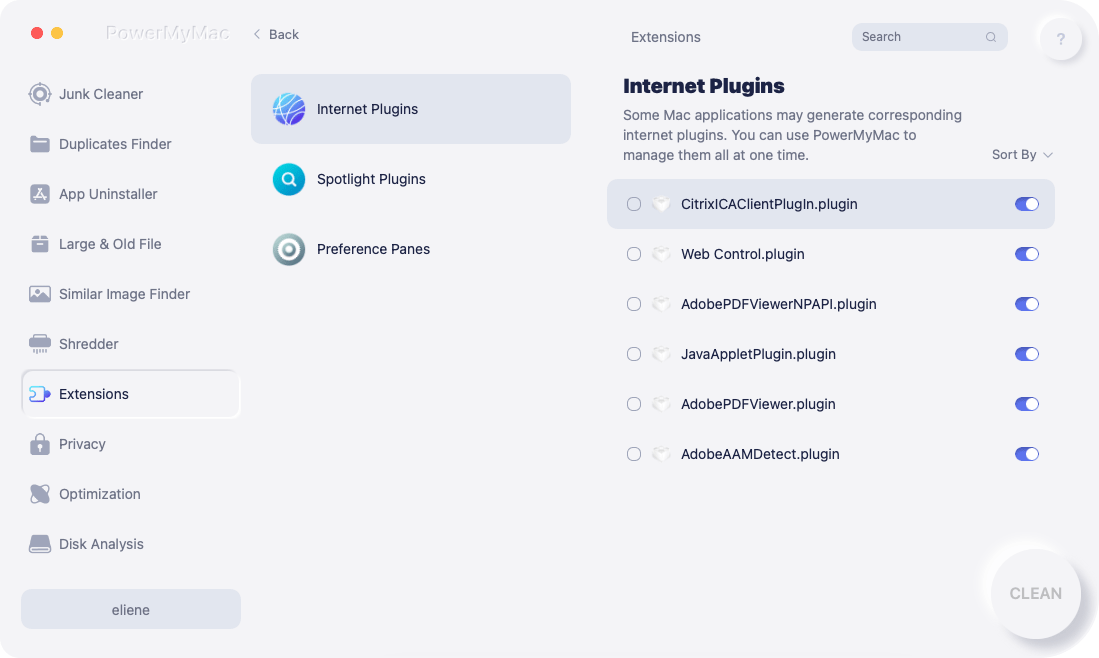
- Choose Extension.
- To launch a search that finds and displays all Mac plugins, including Testpid, choose SCAN from the menu. As you can see, there are three different categories of extensions: Preference Panes, Internet Plugins, and Spotlight Plugins.
- Find all the extensions, add-ons, and plug-ins related to the Testpid.
- You can deactivate them by clicking the button next to those plugins.
Remove Testpid from Mac using the App Uninstaller feature:
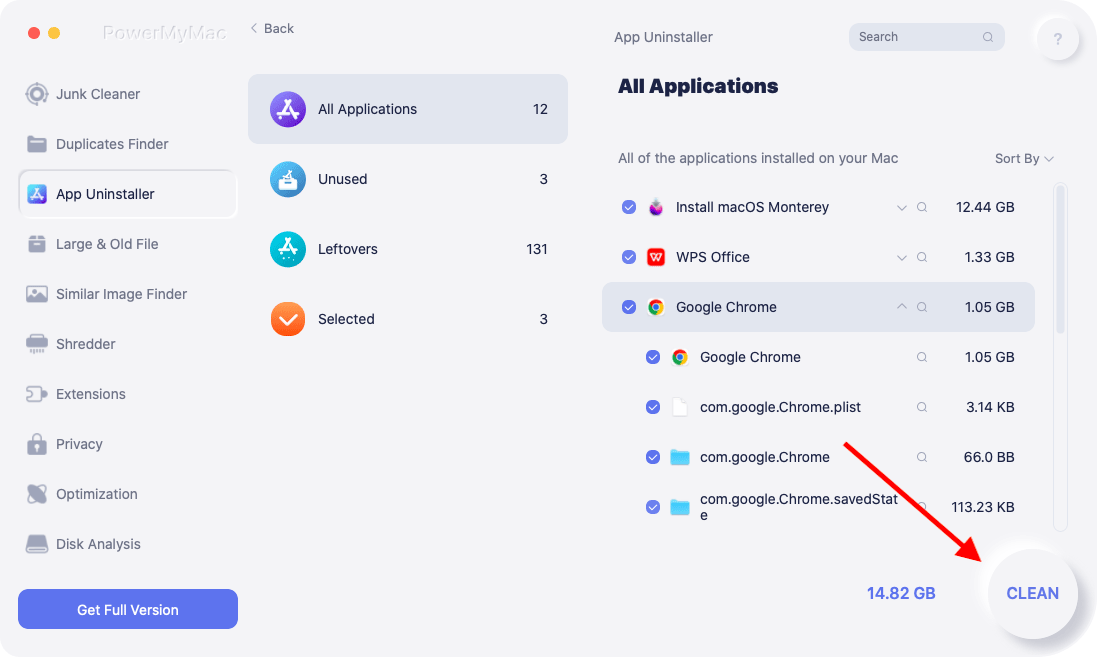
- Launch PowerMyMac, go to the app's home page, and choose App Uninstaller.
- Click SCAN to scan all your computer's applications.
- You may select some suspicious apps, and malware, or Testpid.
- Select "CLEAN" to delete all of your files, including Testpid-related ones.
Then you must have known that using this convenient uninstaller is your better choice. Why not use it by yourself to enjoy its special features? For instance, you can remove GoToMeeting or other software by using its App Uninstaller feature.
Part 4. Conclusion
Testpid ads are frustrating and can stop you from using your browser. Upon reading this post on how to remove Testpid, you should be able to block these pop-ups and get rid of every adware that has found its way onto your Mac.


