


Different kinds of media content are posted every day with the help of video editor applications like Adobe Premiere Pro CC, iMovie, or even Final Cut Pro. DaVinci Resolve, however, somewhat stood out because of the different functionalities that make it compatible with YouTube. But without the right specs for your computer, the app will suddenly close on its own or even experience lagging issues.
Due to this, users have no choice but to uninstall DaVinci Resolve on Mac. To know more on how to remove the software from Mac, find a comfortable position and read on.
Contents: Part 1. Do I Need to Remove DaVinci Resolve from My Computer?Part 2. How to Completely Uninstall DaVinci Resolve on Mac?Part 3. Manual Way to Uninstall DaVinci Resolve on MacPart 4. Conclusion
Part 1. Do I Need to Remove DaVinci Resolve from My Computer?
Social Media has made a great impact on today’s youth, especially YouTube and TikTok. Bloggers and YouTubers all desire one thing and it’s to make their viewers happy and satisfied with what they watch. To do so, they edit their videos to please them. And what better way to edit videos than to use a famous video editing app called DaVinci Resolve. However, some people still want to uninstall DaVinci Resolve on Mac.
DaVinci Resolve is a complex software that isn’t exactly beginner-friendly but with enough time spent exploring, then you’ll surely get to know the program like the back of your hand. It has tons of features all in one tool like color coding, video editing, motion graphics, and audio production. It has been sought after by professionals and even ambitious enthusiasts because of its free version.
Why do they need to uninstall DaVinci Resolve on Mac? Still, all things must come at a price. DaVinci Resolve is that it heavily relies on the performance of both your CPU and GPU. Even RAM isn’t excluded if you work with multiple programs at the same time.
To make it short, it needs a lot of system resources and it may impact your Mac negatively. Aside from the condition of your Mac, you also need to look at the condition of your bank account as premium features are highly expensive. So, if your computer – and your wallet – are short on these, then you may need to remove DaVinci Resolve from your computer.
Part 2. How to Completely Uninstall DaVinci Resolve on Mac?
Manually uninstalling is hard because there are times that not all data from the app has been erased so you need to look for them meticulously. So, what better way than to rely on something high-tech, right? A tool you can rely on can be the iMyMac PowerMyMac.
If you want to completely uninstall DaVinci Resolve on Mac then the App Uninstaller feature on the PowerMyMac will do the trick. It scans all the applications currently installed on your Mac so that you can choose to delete not just the DaVinci Resolve app but other apps, like Adobe CC, Office2016, or PhotoShop.
If you’re still interested, then please read the simple steps provided below to uninstall DaVinci Resolve on Mac using PowerMyMac:
- First, scan all the apps installed. To do so, locate the App Uninstaller and press SCAN.
- Once the scanning is done, a list of categories will be shown. Find All Applications to search for the app or use the search box located in the upper right corner.
- Next, tick the app you want to be removed then press the CLEAN.
- Lastly, a pop-up window will display on-screen, indicating “Cleaned Completed” along with the available space on your disk drive and how many files are removed along with the app.

One great thing about the PowerMyMac is that it can help you identify unneeded apps or junk files, and can even protect your privacy. Not only will it help you uninstall DaVinci Resolve on Mac but it can also do a lot of great things.
Part 3. Manual Way to Uninstall DaVinci Resolve on Mac
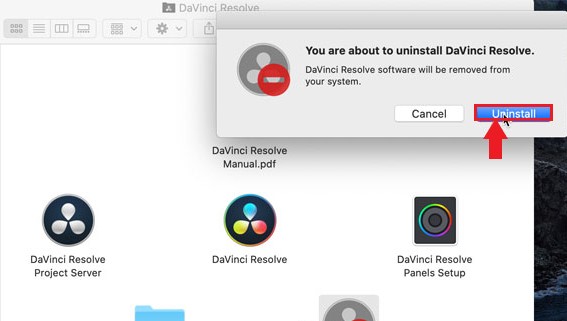
If you prefer to remove DaVinci Resolve from Mac manually than rely on a tool, then fret no more. Some users prefer the long way since it’s very user-friendly.
Despite how hard it is, simple instructions are stated below to ensure the app is completely removed.
- Before you uninstall DaVinci Resolve on Mac, you need to quit DaVinci Resolve in the Dock first before starting. If you’re still unsure whether the app did quit or not, you can check the Activity Monitor.
- Click the CPU tab and select DaVinci Resolve. To quit it, you can either double-click on the app or simply click X.
- After making sure that the app did quit, click Finder again then Applications. But instead of Utilities, highlight DaVinci Resolve. To move it to the trash, press right-click. The tool will now be deleted.
- Lastly, proceed to the Trash folder to empty it, and afterward, you can restart your Mac.
Choosing to uninstall DaVinci Resolve on Mac manually has its downsides but it is accessible, reliable, and easy to use. Still, whether manually or with the use of an app uninstaller, they do the same job and that is to remove the app installed and all of its data on our Mac to free up space.
All we want is for our computer to function lag-free and have no issues with storage. And so, to uninstall DaVinci Resolve on Mac maybe your final resort if you still want your computer to function. Also, there are still alternatives out there that are more suitable for your Mac.
Part 4. Conclusion
There is no debate that DaVinci Resolve is a longtime favorite of those that create content for YouTube due to its capable free version. However, if you still want your computer to function in the long run, then choosing to uninstall DaVinci Resolve on Mac is a great choice with the help of PowerMyMac.
The App Uninstaller is only one of the many amazing features this tool has. Maybe after you’re done freeing up storage space on your computer, you can optimize your Mac and speed up its performance. Download the tool and install it now!

