


Sometimes you may feel like that there's less and less application memory on your Mac, and you want to delete some apps to free up space, OneDrive is on your list.
You can remove OneDrive from Mac manually or using an app uninstaller and cleaner. Both methods work great but manual removal might take a while and involve several steps. Today, we will learn how to uninstall OneDrive on Mac with these two methods.
 TIPS: The fastest way to uninstall OneDrive on Mac completely with all its related files is by using PowerUninstall, this saves lots of time and energy. Just free get the PowerUninstall below to remove any unwanted apps on Mac now!
People Also Read:
Contents: Part 1. How Do I Delete OneDrive from My Mac Manually?Part 2. How Do I Completely Remove OneDrive from Mac?Bonus Tips: How to Restore Deleted Files from OneDrive?FAQs
Part 1. How Do I Delete OneDrive from My Mac Manually?
-
Open Microsoft Word on your Mac.
-
Click on the 'Word' menu and then select 'Sign Out...'.
-
Confirm the sign-out of your OneDrive account in the pop-up window.

How to remove OneDrive from Mac manually? Simply make sure you follow the guide thoroughly and are familiar with these settings:
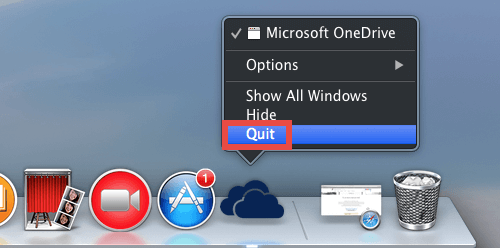
- Quit the OneDrive and close all related services. You can go to the Toolbar, click on the OneDrive icon and click Settings. Select Quit OneDrive.
- Go to the Applications folder via Finder. Find OneDrive.app and right-click and then choose Move to Trash. But doing so will leave some useless app-related files. If more of these junk files accumulate, they will take up storage space on your Mac. You can go to Part 3 to clean up these related junk files and caches together at one time.
- You can also drag the OneDrive icon from the desktop to the trash and enter your Mac credentials when asked. Click OK.
- After removing the app itself, you can also remove manually all of its related contents. Press
Command+ Shift+ Gin Finder. Enter/Users//Library/Containers. - Search for the two folders:
com.microsoft.skydrive-macandcom.microsoft.SkyDriveLauncher. - Drag these folders to the Trash.
However, if you have installed OneDrive using the default setup, you can see the app listed under your name. Simply drag it to the trash bin. Be sure to empty the trash bin to totally remove OneDrive from Mac and free some space.
Part 2. How Do I Completely Remove OneDrive from Mac?
Most of the related files are hidden in the sub-folders of the system library and it takes familiarity and enough time for you to completely get rid of the files. This is the reason why we recommend using a Mac uninstaller to automatically uninstall OneDrive on Mac.
These kinds of tools for app uninstalling take care of the agony we feel when searching for every bit and piece of apps scattered in our system.
One of the highly recommended Mac Uninstaller software is the PowerUninstall, it provides users a free trial version, you can have a free download below to test its powerful function:
PowerUninstall features a comprehensive scan of all the apps stored on your Mac. It does not only searches for a specific app but rather all the apps in your system both old and new. This is also the best time for you to do some cleanup by removing those aged apps that have been cluttering in your Mac.
Using PowerUninstall to remove OneDrive from Mac is simple. It takes a few clicks only:
- Download, install, and launch the PowerUninstall on your Mac.
- Click "See all applications" to find OneDrive.app among the scanned results. Once you click on the specific app, it also displays all the related files so you can select all of them.
- Click the "Uninstall apps" button at the lower right of the screen and wait for the process to be completed.
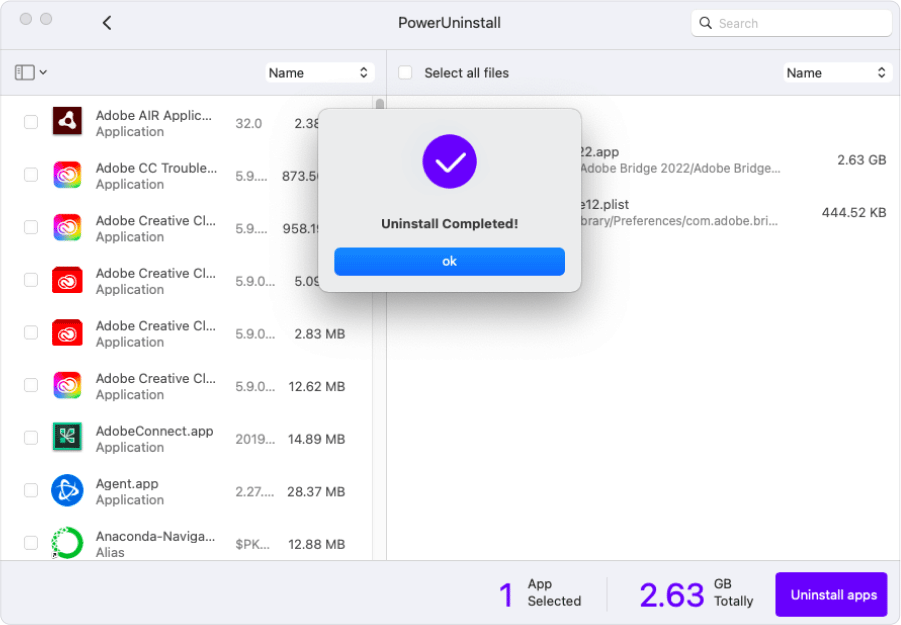
That’s it! You have thoroughly uninstalled OneDrive on Mac together with its related files.
Bonus Tips: How to Restore Deleted Files from OneDrive?
If you are using OneDrive for both personal and work purposes, I suppose you got tons of files stored in it and sometimes overlook at and delete. You might end up restoring these deleted files, but, how can you recover these files? Get some tips and tricks on how to efficiently use OneDrive on Mac.
How to Restore Deleted Files from OneDrive
- Open OneDrive website on your Mac and sign in with your account
- Go to the Recycle Bin in the navigation pane
- Select the files you wish to restore by pointing on each item and clicking on Restore on the checkbox that appears.
How to Restore Deleted Files from OneDrive App on Desktop
- Open the Trash bin
- Find and select the files you wish to recover
- Right-click on each file and click ‘Put back’
- The files will be restored to its previous folder
This option only works when the trash bin has not been emptied yet.
What to Do When OneDrive Stopped Syncing?
Some users have reported sync issues with their OneDrive app on their Macs. There could be a lot of potential causes but the best thing to do is to try to reset OneDrive. If you are experiencing the problem of syncing files with OneDrive, you can follow the steps on how to reset.
- Quit OneDrive. You can do this by selecting the app icon from the top tray and clicking on Settings, then click Quit OneDrive.
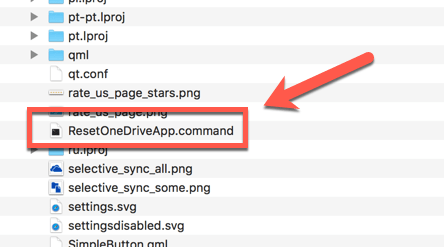
- Open Applications folder from Finder
- Locate the OneDrive app and right-click on it and choose Show Package Contents
- Go to Contents and then Resources folder
- Find
ResetOneDriveApp.commandorResetOneDriveAppStandalone.commandand double-click - Launch OneDrive and complete the setup
However, before you continue resetting OneDrive, make sure you have the latest OneDrive app version. Outdated versions may also cause sync issues.
FAQs
-
How do I permanently stop OneDrive from syncing on my Mac?
To permanently stop OneDrive from syncing on your Mac, follow these steps:- Open the OneDrive app.
- Click on the OneDrive icon in the menu bar.
- Select "Preferences" from the dropdown menu.
- In the Preferences window, go to the "Account" tab.
- Click "Choose folders" and uncheck all the folders you don't want to sync.
- Finally, click "OK" to save your changes. OneDrive will no longer sync the unchecked folders.
-
What happens if I uninstall OneDrive?
If you uninstall OneDrive from your Mac, all the files and folders synced with OneDrive will remain on your computer. However, you will lose the ability to access, update, or sync those files with your OneDrive account. It's recommended to back up any important files before uninstalling OneDrive. -
How to delete OneDrive files from Mac only?
To delete OneDrive files from your Mac without affecting your online OneDrive storage, follow these steps:- Open Finder and navigate to the OneDrive folder.
- Select the files or folders you want to delete.
- Right-click on the selection and choose "Move to Trash" from the dropdown menu.
- Then, empty the Trash to permanently delete the files from your Mac.
-
How to remove the OneDrive folder from the file explorer?
To remove the OneDrive folder from the file explorer on your Mac, follow these steps:- Open Finder and navigate to your user folder.
- Locate the OneDrive folder.
- Drag the OneDrive folder out of the sidebar in Finder to remove it from the sidebar.
- If you want to remove it from the sidebar permanently, go to Finder > Preferences > Sidebar, and uncheck the box next to OneDrive.


mark Rosenthal2022-09-14 19:05:31
OneDrive does not appear on my Mac as an app. It is there because it drives me nuts. Never know where to find a file.
Palmer Swanson2020-07-19 21:01:13
The instructions didn’t work. The next day OneDrive reappeared.
iMyMac2020-07-20 19:49:07
Hi, which way did you try? Did you free try the Mac Cleaner to uninstall it completely?