


I have a lot of files with me. Most of them are work-related files and they have to be organized and kept properly. That’s why I use Dropbox to keep my files and make sure they have a copy.
In case I mistakenly delete my files, I’ll still be able to get what I need. But I’m currently running out of space in my Dropbox. If I have duplicate files in it, I’d have to delete them. How do I find these Dropbox duplicate files on Mac and delete them?
~Dropbox User
 Backing up your files is a great way to keep them safe. If you ever delete these files mistakenly, you can simply get them again using the backup. One way people back up files is through Dropbox.
Dropbox is creating duplicate files. You might be wondering why your Dropbox account is running out of space. Does it contain the files you actually need to store? Or does it contain files you don’t need in storage? You might be second-guessing as to whether your Dropbox account actually has the files you need in it. So, is there a way to delete duplicate photos in Dropbox?
Don’t worry we will help you out with the process of unloading your Dropbox account. This will help you free up more space on the said account and give it more room for more important items.
Article GuidePart 1: How to Find and Remove Dropbox Duplicate FilesPart 2: How to Sync Files with DropboxPart 3: In Conclusion
People Also Read:How to Upgrade To OS X Yosemite?How to speed up El Capitan?
Part 1: How to Find and Remove Dropbox Duplicate Files
How do I delete duplicate photos in Dropbox? Duplicate files are files that are similar or identical in nature. You can free up more space in your Dropbox by deleting duplicate files:
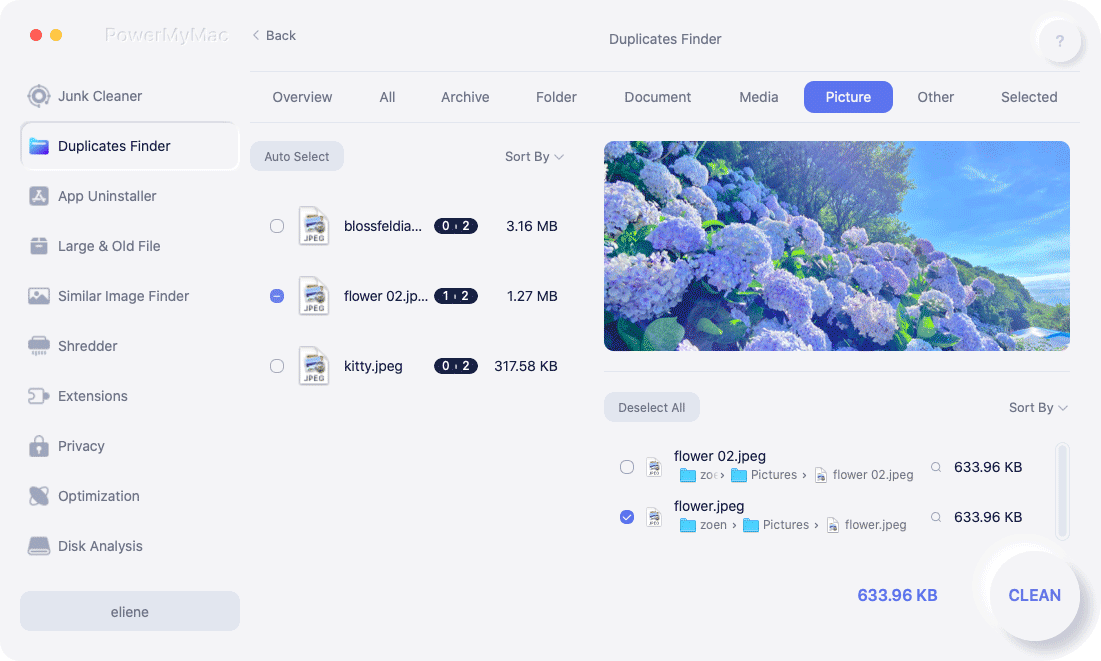
- Launch iMyMac PowerMyMac on your Mac and select Duplicate Finder.
- Press the Scan button to comprehensively scan the device for duplicate files.
- Select Dropbox duplicate files to delete.
- Press the Clean button then click Confirm button and duplicate files on Dropbox will be removed completely.
Why is Dropbox duplicating my files? They can be very different variations. For example, it can be the same document that is uploaded to two different folders in your Dropbox account. Another example might be a file being worked on by two different people.
Can Dropbox identify duplicate files? Dropbox might get two different copies of the same file name. Two different versions of a certain file uploaded by two different people can also be duplicate files.
Two similar photos that almost look alike (but with one version better than the other) can also be duplicate files. These two similar photos can be uploaded in Dropbox and one of the two can be unnecessarily taking up space.
Should I delete Dropbox duplicate files? Those large space can be used up for better purposes, especially for more important files. Thus, we should seek a good way to find duplicate photos and remove them.
So, how do you automatically find duplicate files? Well, you can check them out one by one. But this is a very tedious process. You can opt for an alternative instead-- iMyMac PowerMyMac’s Duplicate Finder tool. This tool can help you find and delete duplicate files instantly.
Here are the advantages and features of this tool:
01 - It helps you free up space on your Mac device. There may be too many applications taking up a large portion of space and slowing down your Mac. By doing so, larger storage space could be saved for more important documents. Plus, it helps speed up your device since it has more breathing space for important processes.
02 - It helps to find duplicate documents, media files, and images. It does a comprehensive scan of your entire device to help you find duplicate files. It is used for multiple file types (not only for images). It can helps you delete Dropbox duplicate files easily.
03 - It has a powerful search feature that comprehensively scans your entire device. It can detect duplicate files even if they have a different file name.
04 - It allows you to be very selective. It displays scanned results by various classifications such as size, type, and date.
05 - It allows you to preview all data before you actually delete it. You can select which files you want to delete and which ones you want to keep. Everything is under your control.
06 - It gives you a free trial. You can check out the features and advantages of the tool for the first 500MB of data before you actually purchase it. Now, you can experience the benefits of iMyMac’s Duplicate Finder without having to put out money from your pocket.
07- It is 100% secure. It does not contain any malware or viruses that might harm your device. It is very safe to use.
08 - It gives you one-on-one support. You can also get support via email if you think you are unsure of how to use the product.
Part 2: How to Sync Files with Dropbox
If you properly sync your files across multiple devices it can be really helpful. That is, as said previously if you do it properly. If the Dropbox account you currently use is syncing files improperly (and out of control), and you have some many Dropbox duplicate files, you have to make sure you organize it well.`
You can actually auto sync folders in your Mac located out of the bounds of your Dropbox folder. It is possible to auto sync folders that you frequently use on your Mac device. This reduces the need to duplicate various files in different locations.
When you auto-sync folders that you frequently use in your Dropbox folder, it helps you free up more storage across various devices and platforms. This is because unnecessary files and duplicate files are eliminated.
How to automatically sync your Mac device with Dropbox step by step
Step 01 - Launch Terminal. You can do this by typing in “terminal” on the Spotlight and hitting the Enter button.
Step 02 - Type the following: “ln –s”
Step 03 - Hit the space button, not the enter button.
Step 04 - Launch Finder.
Step 05 - Locate the folder you wish to sync with the Dropbox folder.
Step 06 - Drag the folder and drop it into the Terminal window.
Step 07 - Launch Finder one more time.
Step 08 - Locate the Dropbox folder.
Step 09 - Drag the Dropbox folder towards the Terminal window
Step 10 - Press the Enter button.
Now, the files that have been saved to the folder you selected will be synced towards your Dropbox account.
How to selective syncing with Dropbox
If you want Dropbox to be installed on a new device, you can try selective sync. This helps you save space in your Dropbox folder.
Standard syncing will sync every file and folder you have. However, selective sync gives you the ability to choose which files and folders get to be synced on Dropbox.
Here’s how to set it up:
Step 01 - Go to the Dropbox icon and right-click it.
Step 02 - Press Settings.
Step 03 - Select Preferences.
Step 04 - Go to the Account Tab.
Step 05 - Go to Selective Sync. Located under it, press Change Settings.
Step 06 - Choose the folders you wish to sync.
Step 07 - Press Update.
Part 3: In Conclusion
Dropbox can be a great way to back up your data. However, if you need more storage space on your Dropbox account and your devices as well, it is best to find Dropbox duplicate files and delete them.
One way to do this is by manually finding each file and deleting them one by one. But this can be a tedious process.
The best way to find duplicate files is through iMyMac PowerMyMac’s Duplicate Finder tool. It helps you find duplicate files and delete them instantly.

